

1stwebdesigner |

| 5 Top jQuery Chart Libraries for Interactive Charts Posted: 11 Mar 2010 01:00 PM PST
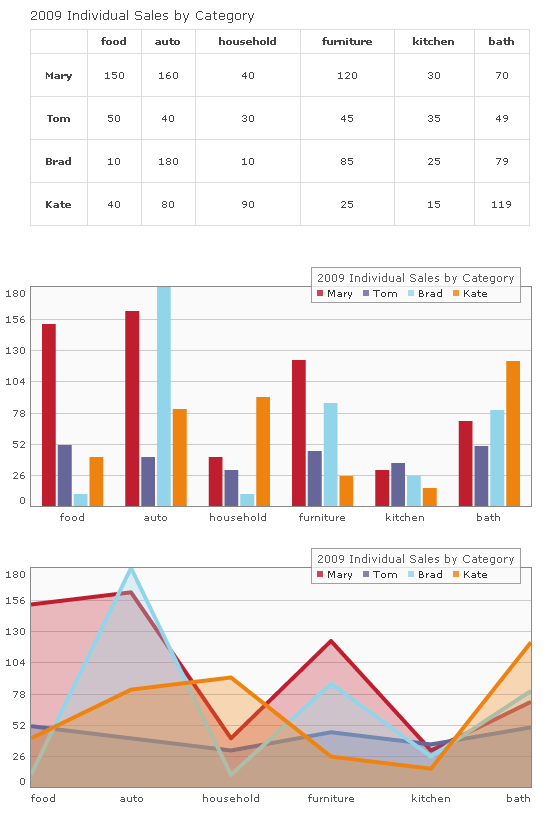
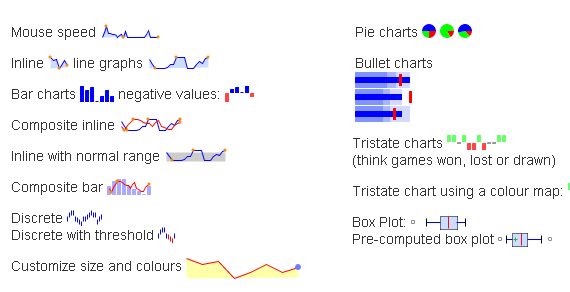
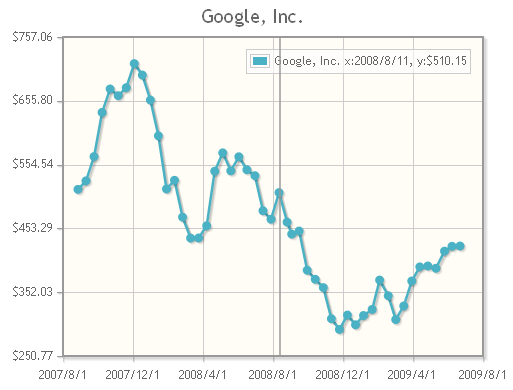
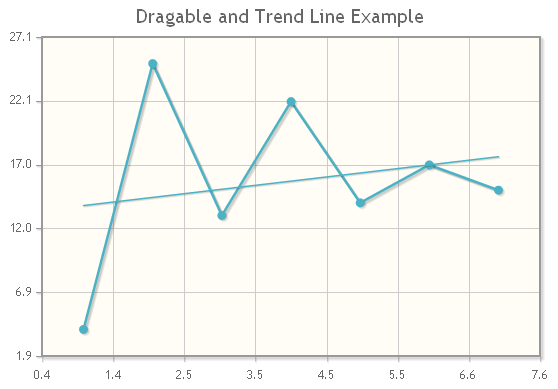
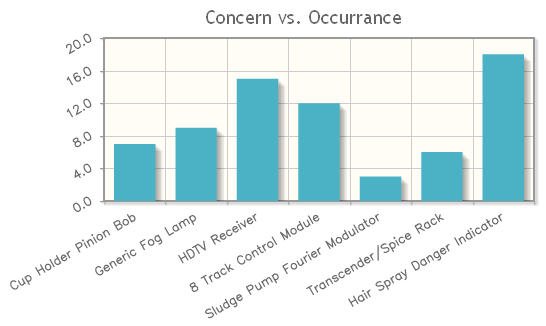
In this article we are going to present 5 chart libraries that suit different needs from simple charts to high complex charts. Most of them are free for personal and commercial use. 1. jQuery Visualize PluginjQuery Visualize Plugin is the perfect plugin if you have a table and want to generate a chart out of it. It offers different types of charts such as Bar, Area, Pie & Line charts. 2. HighchartsHighcharts is a really impressive jQuery Chart Library. In a few words Highcharts is compatible with most Browsers and even the iPhone; numerous chart types are supported; it is a dynamic plugin because you can add, remove and modify series, axes or points at any time after chart creation and you can load data from external files; tooltip labels are also supported which is great for detailed information in a point of a chart; zooming and last but not least all text labels can be rotated in any angle. 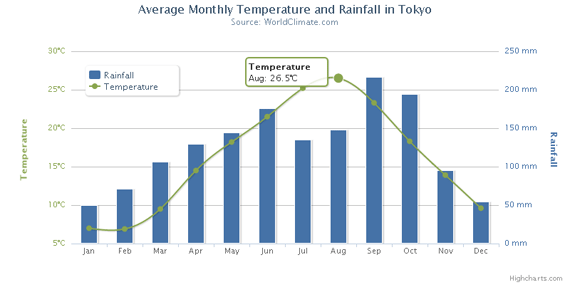 Line and column example 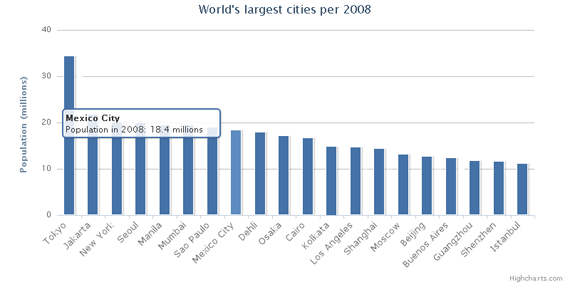 Columns with rotated labels Type of Charts: Bar, Area, Areaspline , Pie, Line, Spline, Column & Scatter. 3. FlotFlot is as the authors call it an "Attractive Javascript plotting for jQuery" which is true. The charts look simple and nice, it is easy to create charts and all settings are optional. Some key features of plot is turning series on/off, zooming, interacting with the data points and it integrates a simple tooltip feature.  Tracking curves with crosshair plugin Type of Charts: Bar, Area, Point & Line. 4. jQuery SparklinesSparklines generates small inline charts either inline in the HTML or via JavaScript. It is really good for displaying mini graphs notably because most of them just take 1 line of HTML or JavaScript code. Another great feature is it self-refreshing capabilities. You can see it in their Mouse-Speed demo which shows you the power of live charting. 5. jqPlotjqPlot did not catch my eye at first glance but after further research I found it to be one of the best and free jQuery chart library. Numerous graphical options are available you can even add shadows and interact per drag&drop in the charts! It even automatically computes trend lines. We could compare it to highcharts in terms of features and functionality.
ConclusionAs you may have seen from this 5 jQuery chart libraries they suit different needs. First Sparklines generates a small inline chart which is perfect for charts where the precision is not important. You look at the small chart and you should directly know what happened. Highcharts, Flot and jqPlot are very powerful jQuery chart libraries. My personal favourites is Highcharts and jqPlot. The visual quality of Highcharts charts are better than jqPlot but the last one is free. I recommend you to test at least one of them and you will see that they are really powerful. Finally jQuery Visualize is really easy to use and specially adapted if you want to create a chart out of a table, just like you would do it in excel. This can be convenient when you need a table and a chart to visualize your thoughts. Feel free to give your feedback via comments section.:) |
| Create A Stylish And Sleek Play-Station Portable Icon Posted: 11 Mar 2010 02:00 AM PST
This is what we’ll be creating today! Looks good? Great – let's get started:
Step 1So at first, let’s create a New Document with sizes – 900×600 px. We will starting by creating the background. Create a new layer (press Ctrl + Shift + N) fill it (with any color). Open the Layer Style window and apply this Gradient Overlay.
This kind of gradient you should get:
Step 2I'm going to use guide lines to create the PSP shape, so let's place all the lines that we're going to need. (To activate the guidelines, you have to activate the rulers at first (CTRL + R) then what you do is click on the ruler, then hold and drag it into position). For the Horizontal guidelines set: 250px, 280px, 510px, and 540px and for the Vertical guidelines: 120px, 200px, 660px and 740px. TIPS:
Pick the Rounded Rectangle Tool (U), set radius to 10px and do the same like I did on the picture below:
Now do the same as I did in the next picture. I used another color so you could see better difference:
Step 3Now create a new layer, set the Brush Tool to 411px and draw two rounded circles as seen in screenshot below:
Now set circled brush layer behind the other layer and erase the parts you don’t need:
Step 4Create a new layer, make selection with Lasso tool(press L to get it) similar like in the screenshot below and fill it:
Duplicate it 3 times more and set the others to each corner of the shape. You can go to Edit, Transform, Flip Vertical and/or Edit, Transform, Flip Horizontal to help you rotate the shapes.
Now select all the (parts) layers (Hold Ctrl and click the layers), right click and select ”merge layers” and add these Blending options:
Step 5Now with your psp shape still selected let’s create a new layer, select the brush tool and choose white. Set 35px for the brush tool and then select the Pen tool (P) and create a line like I did. then right-click and select “stroke path”, choose brush and hit OK. After that click right click and click “delete path” and set the Opacity (of the layer) to 20%.
Create a new layer, set the brush tool to 16 px then select your Pen Tool and create something like this then right click and select “Stroke Path” – choose brush and click Ok. Right click again and click “Delete Path”.
Select the Eraser and erase the unnecessary parts:
Create a new layer, set the brush tool to 170 px and draw the left side to give it shining effect:
Then set the Opacity to 62% and erase the parts you don’t need. Now select your Marque Tool (M) and move your selection using your arrow keys a bit to the right and inverse your selection (Ctrl + Shift + I) and press Delete. Finally press Ctrl + D to De-select your selection. Step 6Let’s create a new layer and create a circle using the Elliptical Marquee Tool (M) (hold down shift to draw a precise symmetrical circle) and fill it.
Open the Blending Options menu and adjust the settings like in image:
Create a new layer and create a smaller circle to fill it:
..and add these Blending Options:
Step 7Create a new layer and add a create a small circle like this,fill it:
Add these Blending Options:
Step 8 – Adding text and detailsNow select the Text Tool (T) and type SONY with a dark color. I used the font Engravers MT, type UMD with the color code: (#a8a8ad)
..then create something like this using your pen tool (P) to achieve little perspective:
Set your Brush Tool to 2 px, then select your Pen Tool again and stroke it with a gray color (mine is #404041). (you can duplicate it and set a darker one in its side like i did) ..then duplicate it (Ctrl + J) and go to Edit, Transform, Horizontal Flip and set the duplicated layer on the other side of the circle.
Step 9 – PSP TextNow create a new layer and using your Pen Tool (P) let’s create the PSP. Lets begin with the “P” – make sure your Brush Tool is set to 2px, select your Pen Tool again and create something like in the screenshot below:
Stroke it with a white color (right click on selection), delete the path. Follow the same steps to do letter "S" as well.
..create selection, stroke it… and do the same with the third letter “P”.
Now add these Blending Options to letters:
Step 10Create a new layer and now we will add a little bit more details in design. Create selection like in the screenshot below with your Polygonal Lasso Tool (L):
Fill it with white and set it below the psp shape layer. DONT DESELECT THE SELECTION. Select your Brush Tool, set it to 42px, and brush something like I did from the corners to get some shadowing and 3D effect.
Okay, we are done with bottom side, now let's get to the top. Create selection like in the screenshot and set it below the PSP shape:
..like this:
Now set these blending Options:
We need the same effect on the other top side of ou gadget right? Just duplicate the layer and go to Edit, Transform, Flip Horizontal and set it on the other side of the PSP shape. Let's compare our outcome which is petty much finished, but we will add some more details to make it look really good:
Step 11 – Final TweakingYou can brush with a black color at the bottom of the PSP like i did in the next picture to achieve more 3D like effect:
Select all the layers EXCEPT THE BACKGROUND (Hold down Ctrl), right click and select merge layers. Hold down Ctrl and click the PSP layer to make a selection, you should get selection like this using your Pen Tool (P):
Right..now set your Foreground Color to white, right click, go to Fill path… and hit OK then set the Opacity to ~ 36%, set your brush tool to a soft brush of 200px, set the Opacity of the brush tool to 50% and erase the parts you don’t need anymore like screenshot below:
Now Duplicate the PSP layer (Ctrl + J) and go to Edit/Transform and select Rotate 180 degrees, set it below the other layer.
Now lets add some reflection, shall we? With the Duplicated layer selected go to Filter, Blur, Gaussian blur and set the radius to 3.8px:
Now set the Duplicated layer’s Opacity to 60%. Select your eraser and set it to a soft brush of ~185% set the eraser’s Opacity to 50% and erase like i did to achieve natural reflection:
Congatulations – you’re done! If you have any questions about any of the steps, don't hesitate to ask! |


| You are subscribed to email updates from Graphic and Web Design Blog -Resources And Tutorials To stop receiving these emails, you may unsubscribe now. | Email delivery powered by Google |
| Google Inc., 20 West Kinzie, Chicago IL USA 60610 | |
Comments (0)
Post a Comment