

1stwebdesigner |

| Myriad Pro: Create a Minimal WordPress Theme in Photoshop Posted: 09 Jun 2011 03:00 AM PDT In this tutorial we are going to create a minimal WordPress theme in Photoshop. Don’t worry if you are new with using Photoshop, any skill level will do. I’ll try my best for you to follow this tutorial from start to finish. Also, you will learn how to create simple patterns to add more texture to our WordPress theme. This is a simple design created in Photoshop. The working demo will soon follow, which will involve converting the PSD file to a working HTML/CSS. So, are you excited? Open your Photoshop now and let’s get started!
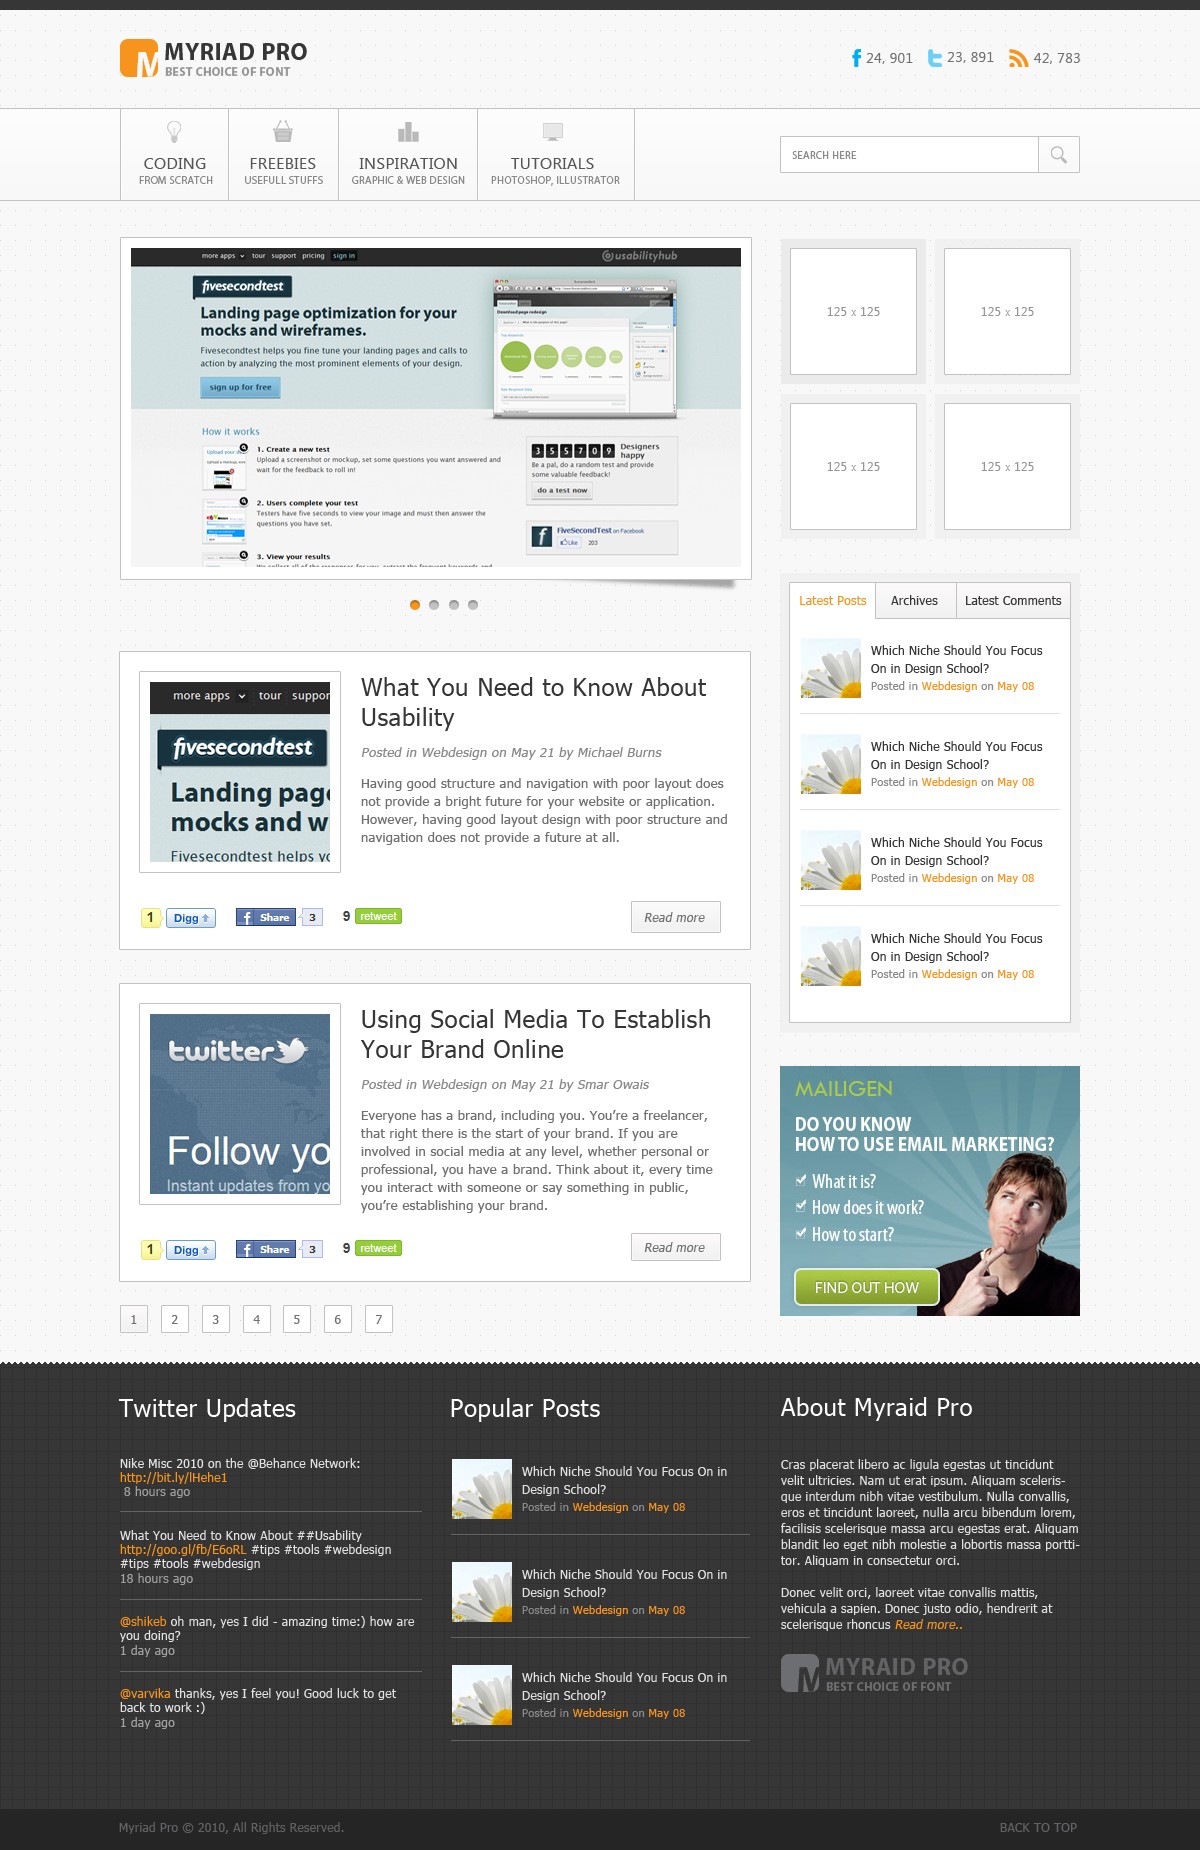
Here is what we will be making, click on the image for full preview:
Resources for this tutorialStep 1: Setting up the DocumentOpen up Photoshop and create a 1200 px x 1850 px document.
Make sure that you have turn on Rulers and Guides
This is 960 grid base layout for this tutorial we will not download it. Let’s simply create our own guide. Go to View – New Guide 120px Vertical Repeat the step and change the value to 1080px.
Step 2: Working with BackgroundDuplicate the the background layer and fill it with #f8f8f8. Next we will create a simple dotted pattern. Create a new document 15px x 15px. Zoom in by pressing Ctrl + . Uncheck the background layer and create another layer, using Pencil Tool create a dot at the top left of our canvas.
Go to Edit – Define Pattern name it dotted. Now back to our layout. Create new layer above the background using the Paint Bucket Tool switch from Foreground to Pattern select the dotted pattern and make the layer Opacity to 15%. Group all the layers we have just created and name it Background.
Using the Rectangle Tool with a fill color of #363636 create a rectangle with a height of 10px starting from the top left of the canvas to the right.
Step 3: Working with Logo
Start by placing a 38pxx 38px using the Rounded Rectangle Tool with a fill of #f7941d. Using Text Tool select Myriad Pro Bold font with a size of 36pt. Place it as shown in the screenshot below.
Add a Layer Mask to the shape we have just created by pressing the button beside the fx button in the layers panel.
Select the Layer Mask then Ctrl + Click to the Text layer to make a selection, fill it with #000000. This will be applied to the layer mask and make the selection transparent into the shape.
Using Text Tool select Myriad Pro.
Step 4: Working with Social IconsOpen up the social icons, change the image size to 19px x 19px by pressing Ctrl + Ctrl + I and change the values of height and width. Place the icons in our canvas with in a new folder named, Social Icons, Refer to the screenshot below for the positioning and colors.
Step 5: Working with Navigation
Create a new group and name it Navigation. As you can see in the screenshot above there is a rectangular shape with a stroke, start by using the Rectangle Tool with a height of 90px. Add this Blending Option:
Open up the Navigation Icons and resize them to 22px x 22px. Make a new group inside the navigation group, name it Icons and place it there. Now that we have our icons, it’s time to put up our navigation links. Follow the screenshot below for the formatting and color of the text.
Merge all the lines you have made by pressing Ctrl + E. Duplicate the merge layer and move it 1px to the right by pressing the right arrow key on the keyboard.
Step 6: Working with SearchCreate a new group above Navigation and name it Search. Using the Rectangle Tool color #ffffff create a shape as shown in the screenshot below.
Add this Blending Option:
Let’s create a search button, using the Rectangular Marquee Tool create a 40px x 35px rectangle and fill it with any color.
Add this Blending Option:
Add this line with a color #c2c2c2, then place the icon 19 px x 19px.
Using the Text Tool add this text in the search field area.
Step 7: Working with Slider
Select the Rectangle Tool with a fill color #ffffff, create a shape 630px x 340px. Add this Blending Option:
Select the shape by pressing Ctrl + Click on the shape layer. Go to Select – Modify – Contract 10px.
Fill the selection with any color and place a sample image that’s the same size.
Below the shape layer create a new layer and name it Shadow. Using the Pen Tool create a shape as shown in the screenshot below and fill it with #000000.
Apply a Gaussian Blur with a Radius of 2px. Set the Layer Opacity to 40%.
Using the Ellipse Tool create four shapes as shown in the screenshot below. Make sure it is aligned to the center.
Add this Blending Option:
The color #c2c2c2 will serve as the normal state of our slider, for our active state change the color to #f7941d
Step 8: Working with Posts
To start, create a new group and name it Posts. Using the Rectangle Tool with a fill color of #ffffff create a 630px x 300px rectangle. Add this Blending Option:
Create another 200px x 200px shape using Rectangle Tool and add the same blending option.
Ctrl + Click the layer to make a selection. Go to Select – Modify – Contract 10px
Fill the selection with any color and place a sample thumbnail image. Using the Text Tool put up the Title of the post, content, author etc.
Lets make a read more button for our post. Create a new group inside Posts and name it more. Using the Rectangle Tool create a 88px x 30px shape. Add this Blending Option:
I just took a screenshot of Digg, Tweet and Facebook and paste it in the bottom left side of the post.
Duplicate Posts folder and place it as shown in the screenshot below.
Step 9: Working with Pages
Create a new group and name it Pages. Create a 26px x 26px shape using the Rectangle Tool. For the inactive pages apply a blending option with a Stroke of #c2c2c2. For the active page just copy the layer styles we applied on the read more button and apply it to the shape.
Step 10: Working with Advertisements
Create a new group and name it Sidebar. Create another group inside Sidebar and name it Advertisement. Using the Rectangle Tool with a fill color of #ebebeb create a 145px x 145px shape. Then set the Layer Opacity to 50%.
Ctrl + Click the layer to make a selection. Go to Select – Modify – Contract 20px. Fill it with #ffffff and add a 1px #c2c2c2 stroke.
Duplicate it four times as shown in the screenshot below.
Step 11: Working with Tabs
Create new group inside Sidebar and name it Tabs. Now select the Rectangle Tool with a fill color of #ebebeb create a 300px x 500 box with a distance 35px below advertisement. Set the layer Opacity to 50%.
This part is just the same as we did in our advertisement, just refer to Step 10.
Create tabs using Line Tool and Text Tool.
Create a new layer below the tabs layers. Using the Rectangle Tool create a shape as shown in the screenshot below.
Add this Blending Option:
Time to create a sample post. Start by grabbing a 60px x 60px sample thumbnail. Also, we will add title of the post, when it is published and in what category.
Group all the layers we have created in our sample post and duplicate it four times.
I also added a sample 300px x 300px advertisement.
Step 12: Working with the Footer
Create new group and name it Footer. Using Rectangle Tool with a fill color of #363636 create a 1200px x 485px shape.
Lets create a new pattern. Create a 6px x 6px file. Unlock the background layer and create a new layer. Set the foreground color to #363636, using Pencil Tool create a pattern as shown in the screenshot below.
Using the Rectangular Marquee Tool make a selection about 3px height starting from left to right and fill it with the pattern we made.
Lets create another pattern. Create a 12px x 12px file. Change the foreground color to #303030. Using Pencil Tool create a pattern as shown in the screenshot below.
In a new layer fill the whole footer with the pattern we have made.
In our footer we will be placing our tweets, popular posts and about, so create a group for each. First we will work on in tweets, using the Text Tool fill in with text the same as shown in the screenshot below.
Next in popular just duplicate the sample posts we have made in our tabs, then we will match the color as we did in our tweets.
Lets proceed to about. Grab some Lorem Ipsum text and place it as shown in the screenshot below. Also I merge the layers of our logo and add a color overlay with a fill color of #6d6e71.
For our final step using the Rectangle Tool with a fill color of #252525 create a 40px high shape, then using Text Tool add a copyright text color #616264.
Finally we’re done! I really hope that you followed and learned something from this tutorial. If you have questions feel free to ask them below. Cheers to all!
|


| You are subscribed to email updates from 1stwebdesigner - Graphic and Web Design Blog To stop receiving these emails, you may unsubscribe now. | Email delivery powered by Google |
| Google Inc., 20 West Kinzie, Chicago IL USA 60610 | |
Comments (0)
Post a Comment