1stwebdesigner

Posted by | Posted on 17:20

1stwebdesigner


5 Advanced Google Tricks to Help You Become a Better Web Designer

Posted: 30 Sep 2010 02:00 PM PDT

You can use some simple Google tools in very creative ways, as well as use some more advanced ones to:

  • find high-quality tutorials for any web design software tool, and find them easier and faster
  • find decent alternatives for the current web design software you’re using
  • search for what Spanish (or <insert your favorite nation here>) web designers are talking about

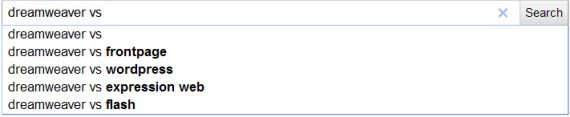
…and much more! You’ll learn all of this in the text below. I’ll use specific examples to illustrate my points, but that doesn’t mean you can’t use your own examples when you understand the points. So let’s get started, shall we?

1. A Small Google Suggest Trick Can Help You Find What Kind of Photoshop Brushes People Are Searching For…

Let’s suppose you’re looking for Photoshop brushes on Google. So you type ‘Photoshop brushes’ in Google and get the usual results. One of the first things you will eventually find is what type of brushes exist. The traditional way people do this is going through multiple sites, seeing what they have to offer and using a lot of trial & error.

But what if I told you there’s a better way to find what type of brushes people are actually searching for on Google? That can help you find some popular (and with the wisdom of crowds, popular can mean good) brushes you can use in your designs. How can you do this? With Google Suggested Results.

How to do it: Type ‘photoshop brushes’ into Google. Suggested results will appear (depending on whether or not you have Instant turned on, you’ll see 5 or 10 suggested results max. I’ll turn off Instant for now in order to get more suggested results). Position your mouse cursor immediately after ‘photoshop’. Now press space. The following should appear:

That’s cool and everything, but not enough for us. We want more relevant results, we want to see more types of Photoshop brushes!! What about I type some letter…like b:

That’s cool already! You can do this with almost every letter and see what type of Photoshop brushes are people actually searching for. For z, it is “zebra” and “zipper” brushes. For h, it is “hair” and “heart”.

You can do this with almost any type of keyword that is broad enough in order to display specific results like these. Keywords like “dreamweaver templates” or “wordpress themes” or “Illustrator patterns”, for example.

2. Using a Web Design Software but Think There’s a Better One Out There? Here’s How to Find Quality Alternatives

Let’s say you’re using Dreamweaver and are looking for a more extensive list of alternatives. Sure, you can type ‘Dreamweaver alternatives’ but what about using some creative queries to get more relevant results…like THIS ONE:

The “better than” keyword can help you find alternatives to practically any web design (or any type of) software out there. “Better than Photoshop”? “Better Than Xara”? You name it and the Google index of 1+ trillion pages has it :)

Another great way to find alternatives to software is to use the “vs.” trick. Let’s go with our Dreamweaver example and see what people use to compare this software to:

or we can go the other way around, put the “vs” behind “dreamweaver” and position the cursor behind the “vs” like this:

We got 2-3 new alternatives!

3. Want to Find Related Keywords to the One You Just Typed? No Worries!

If you click on “more search tools” on the left of the Google results and then on “related searches” you should be presented with some amazing options on related keywords you can use to find what you’re looking for. This is especially useful if the topic you’re searching for is new and unknown to you.

Let’s say you’re interested in learning more about AJAX. You know PHP and you know Javascript but have no idea in what way is exactly Ajax related to them. So you try and type ‘ajax’ and select ‘related searches’. Here is what you get:

This can give you a good foundation on where to start. You can type ‘ajax php’ and ‘ajax javascript’ to see articles on how these 2 technologies directly relate, then you can look for examples and tutorials, XML and so on. Some of these things are obvious but, the truth is, our memory is often too limited to remember to do all obvious things at once. Related searches can be a good reminder to suggest to you what to search for next.

4. Looking for advanced tutorials? Search by file type

As a rule of thumb, PDF files contain tutorials that are often more extensive and offer more information than ordinary web pages. The downside? There are not that many free PDF tutorials on the web. You can try to use the “filetype:pdf” modifier in Google, however, to search for a specific file type only (in this case PDF) and see if you can get some relevant results.

I think that the sheer amount of tutorials hosted on the web nowadays, by quantity is exceeding the amount of information tutorials made in PDF files currently provide. If you want to save time, however, a good idea would be to try and to filter using PDF file type see see some interesting stuff.

*another tip:

I’ve noticed that often, tutorials are in the format “how to create/make _________ in program-name”. You can use this + the first trick above to find ideas on what tutorials people are searching for. For example:

A little bit of creativity and everything’s possible :)

5. Fireworks Tutorials in Spanish?

This is very fun :) You can use Google Translated Search to search sites in Spanish using English. For example:

Isn’t that neat? :)

Oh and by the way, it’s not that this is useless, you can actually find a lot of good stuff there. Why? I haven’t checked if this is exactly true, but I know from experience that you I get more quality stuff in other languages. While those people might not have many original tutorials, they take the best English tutorials and translate them into their own language. So you can potentially find a lot of high-quality stuff using Translated Search fast.

How to Make a Successful Transition from Employee to Freelancer

Posted: 30 Sep 2010 03:00 AM PDT

Taking the step from being a regular employee with a safe and stable income and to becoming a freelancer with all the challenges that come with it can be hard. In this article we’ll give you some tips on how to make the transition as painless as possible. There are many things you should consider doing to be prepared. Hopefully this can be of help to all those considering going freelance.

It sounds so easy: quit your current job, set up a desk in a spare room at home, and start working as a freelancer.

Picture by Blade Multimedia

Unfortunately it isn’t as easy when you’re standing there getting ready to take the leap. As we’ve talked about in previous articles there are both good and bad sites to being a freelancers. There are many things that can go wrong, but also a lot of possible benefits if you work hard to succeed.

Now let’s have a look at what you can do to make the transition as good for yourself as possible!

Read up

Read up on freelancing to know what’s ahead of you. We have a lot of freelance tips here at 1stwebdesigner, and you’ll find a lot of other websites out there that have good resources for you. Find different forums to see what others that have walked the path before you have to say. There are many other freelancers all over the world and they many times share a lot of valuable information. Something as easy as searching for freelancing through bigger search engines can give many interesting hits.

Local support

Picture by Enrico Nunziati

In many countries there has been set up various services to help out new business owners and freelancers. Check out what’s available in your area. For instance in my community there are cheaper office spaces for rent for the first year someones in business, great financial help that can be offered and much more. It’s therefore a good idea to at least check this out before you go into business. There are also several places where local freelancers/business owners have set up different work and support groups that it can be very valuable to become part of.

Save up some money

By saving up ahead it’ll be a lot easier the first months if you’re having a hard time getting projects in the start. As your monthly bills still have to be paid, not having a steady income can be hard to get used to. If you’re able to save up some money, you will minimize some of all the stress you will be experiencing in the beginning. Starting your freelance career with no money at all can cause you many problems and be very risky.

Make an overview of goals

Picture by Sigurd Decroos

Set up what your goals are and how to get there. After you’ve been in business for a while it will be easier to see if you are on track. After a month or two you should use these goals and your experiences to set up an overall business plan. Once you have a good plan to start off with it will also be easier to get help both financially and if you’re looking to others to collaborate with. You’ll quickly notice that having a clear plan will always be helpful in several different ways.

Registering your company

In most countries, even if you’re just freelancing you will need to register your business. Check out what is the case for your country to make sure it’s done the legal and correct way from day one. If you fail at this you could be in a lot of trouble.

Make the important practical decisions

Picture by Svilen Milev

Before your start-up you have to make all the important decisions that will help shape your business. Will it work to set up a workspace at home or should you rent a space? Will you need another phone or internet line? There are many questions like these that you will have to answer. My tip is to sit down one day and imagine a workday as you see it when you start freelancing. Go through it in your mind including when you start, where you’ll be located, what equipment to use, how to do meetings with clients, how to organize lunch breaks + +. This will help you see some things that you will need to consider.

Insurance, bank-accounts and such

This is hand in hand with the previous point. Make sure to have proper insurance, have a business bank account to not get it mixed up with personal stuff and so on. Maybe you should get a post box to have a company address too. Several things need to be taken care of.

Make sure to have working equipment and software

When you’ve made decisions on how to work, where to work and so on – it’s time to see if you have what you need. Most people tend to have a lot of what they need already and can avoid any bigger investments in equipment in the beginning. Go through what you have properly and decide if anything has to be repaired or upgraded in order for you to work well from day one.

Make a good portfolio

Picture by Jakub Krechowicz

One thing that can really make everything easier on you is building a portfolio BEFORE leaving your current job. To get new clients you often need to have a portfolio to show in order for them to see that you know what you’re doing, and get a good idea of what you have to offer. If you have problems building a portfolio you can try to find crowdsourcing projects or contests to attend. It’s without doubt a good tip to work a bit on the side to get a few projects that can be used for later reference. This could also mean that you have to take on some charity work or get less paid. Nevertheless building a portfolio and getting that experience is worth it.

Logo

Getting a logo is a must! Many designers make their own logos and succeed with it. Check out our logo article for some great tips: Brilliant Tips and Guidelines for Professional Logo Design. That article will tell you what you need to know. No matter if you’re making it yourself or having someone else do it you should focus on having it ready before you start.

Printed media

Picture by Martin Simonis

Prepping business-cards, brochures, envelopes and letterheads with your logos on can be done ahead to ease the pressure when you’re starting up. Many designers do a lot of this part themselves. Just make sure to have everything ready when you start, so that you can hand out business cards and look professional from the fist potential client that you meet.

Website/blog

A good website or blog is important from almost any freelancer out there. This is a great way to be available to customers worldwide and you can also include your portfolio online for easier access. Where some designers are pros at web design, others would be better leaving this to others. A good website can mean a lot and this part should not be overlooked.

Planning application

Picture by Hilde Vanstraelen

Find a planning application that works for you. There are many good ones out there that are completely free. Try out a few different ones. Planning your days properly will definitely pay off the second you start getting more and more to do.

Time-tracking and invoicing

As with planning, you need a good system for time-tracking and invoicing. Check out what others use to get some advice, or just dive in and try out a handful of different ones. By using good software you will save a lot of time and confusion later on.

Marketing

Picture by Viktors Kozers

You will need to have a look at how to market your business and what it will cost you. A lot of the tasks related to making a campaign and various offers you want to give can be done beforehand. Once you get started you will probably have enough on your mind. Think through how you want to get your name out there and attract new customers. This can be advertising on other websites, using local newspapers, calling contacts from your studying days or having a contest on your website. Be creative and spend some time on this part.

Do a test-day or week

If you have some days off you should consider doing a little test run as a freelancer. Use smaller projects you’ve gotten or set up a training case. By working a few days you will be able to see several things that you may not have thought of and do some last-minute adjustments.

Network

Picture by Clix

You probably have Twitter, Facebook and other types of social media accounts. Try to get connected with other freelancers, potential clients and so on. And tell everyone you’re about to start a new business. If you’re lucky you’ll get some new clients just by mention it + a lot of good advice from your online friends.

Do you need any experts to help you out?

Many questions will occur here. Do you need someone else to help you take care of accounting and billings? Do you need a company to develop a website or can you do this on your own? This has to be figured out and will also have great impact on your budget.

Conclusion

Picture by Eran Becker

Once you’ve gone through these steps you’re well prepared. What is required will depend on many different things but it’s highly advisable that you do as much as possible beforehand. Remember that if you find out that you’re not ready yet, waiting for a little while longer can probably be a good idea.

If you want to find out more about this topic, make sure to check out our recent article: The signs that you’re ready to start freelancing.

Finally we’d love to hear your comments and your own advice on this.

Good luck!


WebResourcesDepot

Posted by | Posted on 13:17

WebResourcesDepot


OpenCal – Impressive Online Appointment Scheduling App – 3 Accounts Giveaway

Posted: 29 Sep 2010 11:45 PM PDT

OpenCal LogoOpenCal, a powerful and shiny online appointment scheduling application, is giving away 3 Team Plan Accounts for 6 months ($39/month value) to WRD readers.

Details on joining the giveaway can be found at the bottom of this post. But before that:

What is OpenCal?

For many of us, appointments are a part of our business. Meeting with clients, partners, etc. And for some, appointments are the core of the business like consultants, professionals, health & beauty specialists, contractors, etc..

OpenCal is an impressive web application that makes booking appointments online (and offlline) easy and manageable.

Once you define your services and working hours, the application provides you a "Book Online Now" button which you can insert into your web pages, emails, craigslist listings, etc.

OpenCal - Online Appointment Scheduling

Users can click on that anytime, see the available + non-available spots, book an appointment themselves and cancel or re-schedule when needed (according to the rules you define).

The administrator is able to approve them automatically or manually, create and manage appointments via drag n' drop and export them to Outlook, iCal or other calendars if needed.

With the functionality offered, OpenCal ends up helping you keeping track of both your clients and staff. You can add notes to each client, get client-specific reports or export the full client list.

And for the staff, new ones can be added anytime and their bios + pictures can be uploaded for your clients to see.

OpenCal - Online Appointment Calendar

The service also has many upcoming improvements such as PayPal integration, Google calendar sync, business reports, and online marketing tools.

One last and handy feature is, if you don't have your own website, OpenCal provides you a customizable SEO friendly mini-website that includes the details of your business like your services, working hours, staff and the location (with Google Maps).

And, if you're a web designer, make sure to check out the OpenCal Partner Program for generating an extra revenue by integrating OpenCal into your client's websites

How to win the licenses?

In order to get a chance to win one of the 3 Team Plan Accounts for 6 months ($39/month value) from this online appointment scheduling software, just comment to this post and winners will be selected on 6th of October 2010 (1 week later) with the query below:

SELECT * FROM wp_comments WHERE comment_post_id=1867 AND comment_approved=1 AND comment_type='' GROUP BY comment_author_email ORDER BY RAND() LIMIT 3

Good luck to everyone.

Special Downloads:
Ajaxed Add-To-Basket Scenarios With jQuery And PHP
Free Admin Template For Web Applications
jQuery Dynamic Drag’n Drop
ScheduledTweets

Advertisements:
Professional XHTML Admin Template ($15 Discount With The Code: WRD.)
Psd to Xhtml
SSLmatic – Cheap SSL Certificates (from $19.99/year)

Tags:

Related posts


1stwebdesigner

Posted by | Posted on 18:31

1stwebdesigner


45 Creative Examples of Illustrated Characters in Website Design

Posted: 29 Sep 2010 02:00 PM PDT

Character IllustrationI am huge fan of website with character illustration, Using characters in your website design not only improves your website visually but also easily connects with the audience in one way or the other. Now-a-days use of character illustration is not limited to just gaming website, people from various background like cooperates, individual & bloggers  are using illustrated characters in their design to gain some extra attention.

Using character illustration in website design can help you in many ways. I have shared some amazing websites that are making effective use of character illustration in their website design for your inspiration.

1.Vunky Blog

2.Naldz Graphics

3.Inspired Monkey

4.CSS Jockey

5.John O’Nolan

6. Smashing Magazine

7.Moxie Design Studios

8.Black Moon Design

9.Get Me Fast

10.Michael Coyle

11.VEBOO Labs

12.Creative Switch

13.Cats Who Blog

14.Iwit

15.Using character for introduction

16.Agencia Mobi

17.Inspiredology

18.Stone Skipper

19.Code Button

20.iii

21.Profsouz

22.Character centric navigation on website (Jason Gray)

23.Crayons Life

24.MultiWays

25.John Shammas

26.Pixel Cookers

27.Real Men

28.Interactive Character Design Website (Meomi)

29.Vision 18

30.Awesome Js

31. Representing 404 with character illustration

32.The Many Faces Of

33.Natrashka

34.Minding Monsters

35.Vincent Mazza

36.Illustrating your services using your character

37.Call-to-action parameter in design using character

38.Indiqo

39.Ephfx

40.Tijuana Flats

41.Single Frame Design

42.Robert Fenech

43.Mochimedia

44.Introducing fun elements in website through character

45.Making your own personal character for personal branding

Tell us in comments if you have created website with character illustration in it or which example from list you like the most.

The Ultimate Guide to Object Oriented Basics of JavaScript

Posted: 29 Sep 2010 03:00 AM PDT

Thanks to expertly crafted libraries such as jQuery and MooTools, JavaScript has become a foundation of Front-End Development. However, it’s extremely important that we note the higher level concepts utilized in these wonderful libraries. Why is that? As web developers, we must equally balance learning the current programming trends with attempts to push the boundaries of those trends. Without this balance, no innovation will occur in web development. So let’s take a moment to appreciate the fundamentals of JavaScript Object Oriented Programming, which include classes, inheritance, and scope.

Classes

Before we learn how to implement classes into your code, let’s discuss what classes are and why you should bother learning/using them.

As stated in the Java documentation, “A class is the blueprint from which individual objects are created.” Consider an actual blueprint used in the process of making a house. The builders use the blueprint to evaluate what properties the house contains and what functions the house will execute. Classes are a convenient way to represent the properties of objects, be it a house, car, or person. Classes become especially useful when more than one of a given object exists.

As an example, let’s compare two real-life objects without the use of classes. This mirrors the procedural thought process as opposed to the object oriented thought process. We’ll describe a man named Rob and a baby girl named Emillee. We must assume we know nothing about the human body since we have no blueprint(class) to work from.

Rob:

  1. Rob has two oval-like structures a few inches apart on the upper portion of his body. These oval like structures have a white background with a brown middle.
  2. Rob has two structures that run relatively parallel to the floor that seem to indicate the most vertical portion of the body that’s still part of the body’s base.
  3. Rob has two appendages that extend from another two appendages. These seem to be used to grab items. They seem relatively large.
  4. Rob measures approximately 6 feet in height.
  5. Rob involuntarily intakes oxygen and converts it into Carbon Dioxide.

Emilee:

  1. Emillee has two oval-like structures a few inches apart on the upper portion of her body. These oval like structures have a white background with a blue middle.
  2. Emillee has two structures that run relatively parallel to the floor that seem to indicate the most vertical portion of the body that’s still part of the body’s base.
  3. Emillee has two appendages that extend from another two appendages. These seem to be used to grab items. They seem relatively small.
  4. Emillee measures approximately 1.5 feet in height.
  5. Emillee involuntarily intakes oxygen and converts it into Carbon Dioxide.

That was a LOT of work to just describe a human’s 1) Eyes, 2) Shoulders, 3) Hands, 4) Height, and 5) Act of Breathing. Notice we had to make almost the exact same observations both times since we had no blueprint to work from. While describing 2 people wasn’t too bad, what if we wanted to describe 100, 1000, a million? There certainly has to be a more efficient way of describing objects that have similar properties: This is where classes shine.

Let’s rethink the previous example using an object oriented mindset. Since we are describing a man and a baby girl, we know they are both humans. So let’s first create a simple blueprint for humans.

Humans:

  1. Have two oval-like structures a few inches apart on the upper portion of his body. These oval like structures have a white background with a varying color in the middle. We call them eyes.
  2. Have two structures that run relatively parallel to the floor that seem to indicate the most vertical portion of the body that’s still part of the body’s base. We call them shoulders.
  3. Have two appendages that extend from another two appendages. These seem to be used to grab items. Their size varies. We call them hands.
  4. Vary in height depending on age and other factors. We call this height.
  5. Involuntarily intake oxygen and convert it into Carbon Dioxide. We call this breathing.

So we’ve stated that the properties of humans are that they have eyes, shoulders, hands, and a height. We’ve also stated that these properties may vary. Having defined the blueprint of a Human, and having declared that Rob and Emillee are human, we can apply what we already know about humans to Rob and Emillee.

Rob is a Human.

  1. Rob has brown eyes
  2. Rob has shoulders
  3. Rob has large hands
  4. Rob is 6 feet tall
  5. Rob breathes

Emillee is a Human.

  1. Emillee has blue eyes
  2. Emillee has shoulders
  3. Emillee has small hands
  4. Emillee is 1.5 feet tall
  5. Emillee breathes

By explicitly stating Rob and Emillee are Human, we take the properties and functions associated with being Human and apply them directly to Rob and Emillee. This lets us avoid redefining all the body parts while also letting us effectively describe the key differences between the two objects.

Here are a few examples of classes and their objects(known as instances of the class) so you understand the relationship between the two.

Class Student

  • Properties: grades, age, date of birth, SSID
  • Functions: calculate GPA, view absences, update conduct

Class Employee

  • Properties: EIN, hourly wage, contact number, insurance
  • Functions: set wage, view productivity, pull resume

Class Computer

  • Properties: CPU, motherboard, monitor
  • Functions: turn on, turn off, restart

So now that we understand the idea behind classes, let’s apply what we know to JavaScript. Unlike languages including PHP and C++, JavaScript does not have the class data type. However, using JavaScripts flexibility, we can easily mimic a class using functions.

Referring to one of our previous examples, let’s use a class to represent students.

When creating a class, there are two things you must do: You must know what properties/functions(also known as methods) the class will have, and you need to initialize the properties with a value.

 	function Student(name, gender, age, grade, teacher) 	{ 		this.name = name; 		this.gender = gender; 		this.age = age; 		this.grade = grade; 		this.teacher = teacher; 	}  	var bob = new Student("bob", "male", 15, 10, "Marlow"); 	alert(bob.age); //Outputs 15  	var susan = new Student("susan", "female", 10, 5, "Gresham"); 	alert(susan.gender); //Outputs 'female' 

From this example we can see that instances of the class are initiated using the new operator. Properties and methods of the class are accessed using the . (dot) operator. So to get the property age of the instance of the Student class named bob, we simply use bob.age. Similarly, we created an instance of the Student class and assigned that to susan. To get the gender of susan, we simply use susan.gender. The code readability benefits from classes are enormous: You can reason that bob.age is the age of bob without having any programming experience.

However, the previous example contains two detrimental (but easily fixable) flaws.
1) The class properties can be accessed by any statement
2) The arguments must be passed in a certain order

Keeping property values private

Note that in the previous example, we were able to get the value of bob.age by simply calling bob.age. Additionally, we could set bob.age to any value we feel like anywhere in the program.

 	var bob = new Student("bob", "male", 15, 10, "Marlow"); 	alert(bob.age); //Outputs 15  	bob.age = 9; 	alert(bob.age); //Outputs 9; 

Seems harmless, right? Well, consider this example.

 	var bob = new Student("bob", "male", 15, 10, "Marlow"); 	alert(bob.age); //Outputs 15  	bob.age = -50; 	alert(bob.age); //Outputs -50; 

We have age as a negative number: A logical inconsistency. We can prevent issues like this and preserve the integrity of our data by utilizing the concept of private variables. A private variable is a variable that can only be accessed within the class itself. While once again JavaScript does not have a reserve word for making a variable private, JavaScript gives us the tools to create the same effect.

 	function Student(name, gender, age, grade, teacher) 	{ 		var studentName = name; 		var studentGender = gender; 		var studentGrade = grade; 		var studentTeacher = teacher; 		var studentAge = age;  		this.getAge = function() 		{ 			return studentAge; 		};  		this.setAge = function(val) 		{ 			studentAge = Math.abs(val); //Keep age positive using absolute value 		}; 	}  	var bob = new Student("bob", "male", 15, 10, "Marlow"); 	alert(bob.studentAge); //undefined, since age is privately protected in the class definition  	alert(bob.getAge()); //Outputs 15 	bob.setAge(-20); 	alert(bob.getAge()); //Outputs 20 

By using variable declarations as opposed to attributing properties directly to the class, we have protected the integrity of our age data. Since JavaScript utilizes function scope, a variable declared within our class will not be made accessible outside of that class unless explicitly returned by a function within the class. The method this.getAge, which returns the student age to the calling environment, is known as an Accessor method. An Accessor method returns the value of a property so that the value can be used outside the class without affecting the value inside the class. Accessor methods are usually preceded with the word “get” by convention. The method this.setAge is known as a Mutation method. Its purpose is to alter the value of a property and preserve its integrity.

So we see the benefits of using Accessor and Mutation methods within a class to preserve the integrity of data. However, creating an Accessor method for each property creates extremely long-winded code.

 	function Student(name, gender, age, grade, teacher) 	{ 		var studentName = name; 		var studentGender = gender; 		var studentGrade = grade; 		var studentTeacher = teacher; 		var studentAge = age;  		this.getName = function() 		{ 			return studentName; 		};  		this.getGender = function() 		{ 			return studentGender; 		};  		this.getGrade = function() 		{ 			return studentGrade; 		};  		this.getTeacher = function() 		{ 			return studentTeacher; 		};  		this.getAge = function() 		{ 			return studentAge; 		};  		this.setAge = function(val) 		{ 			studentAge = Math.abs(val); //Keep age positive using absolute value 		}; 	}  	var bob = new Student("bob", "male", 15, 10, "Marlow"); 	alert(bob.studentGender); //undefined, since gender is privately protected in the class definition  	alert(bob.getGender()); //Outputs 'male' 

My C++ Professor always said “If you find yourself typing the same code over and over, you’re doing it wrong.” Indeed there is a more efficient way to create Accessor methods for each property. Additionally, this mechanism also eliminates the need to call function arguments in a specific order.

Dynamically Generated Accessor methods

This demonstration is based off John Resig’s Pro JavaScript Techniques book (which I highly encourage you to read. The first 3 chapters alone are worth it).

 	function Student( properties ) 	{ 		var $this = this;  //Store class scope into a variable named $this  		//Iterate through the properties of the object 		for ( var i in properties ) 		{  			(function(i) 			{ 				// Dynamically create an accessor method 				$this[ "get" + i ] = function() 				{ 					return properties[i]; 				}; 			})(i); 		} 	}  	// Create a new user object instance and pass in an object of 	// properties to seed it with 	var student = new Student( 	{ 		Name: "Bob", 		Age: 15, 		Gender: "male" 	});  	alert(student.name); //Undefined due to the property being private  	alert(student.getName()); //Outputs "Bob" 	alert(student.getAge()); //Outputs 15 	alert(student.getGender()); //Outputs "male" 

By implementing this technique, not only do we keep our properties private, we avoid the need to specify our arguments in order. The following class instantiations are all equivalent

 	var student = new Student( 	{ 		Name: "Bob", 		Age: 15, 		Gender: "male" 	});  	var student = new Student( 	{ 		Age: 15, 		Name: "Bob", 		Gender: "male" 	});  	var student = new Student( 	{ 		Gender: "male", 		Age: 15, 		Name: "Bob" 	}); 

Inheritance

Recall that throughout this article I’ve used the term “class” extremely loosely. As stated before, JavaScript has no class entity, but the pattern of classes can still be followed. The main difference between JavaScript and other object oriented languages lies in their inheritance models. C++ and Java exhibit Class-based or “Classical” inheritance. JavaScript, on the other hand, exhibits Prototypal Inheritance. In other object oriented languages, class is an actual data type that represents the blueprint for creating objects. In JavaScript, although we can use Functions to simulate an object blueprint, they are just in fact objects themselves. These objects are then used as models (aka prototypes) for other objects.(See Article JavaScript Prototypal Inheritance).

Applying the concept of prototypal inheritance allows us to create “subclasses”, or objects that inherit the properties of another object. This becomes particularly useful when we want to use the methods of another object with some slight modifications.

Consider a class Employee. Let’s say we have two types of employees: wage-based and commission-based. These employee types will have many similar properties. For example, regardless of whether an employee receives income through commission or receives income through wages, an employee will have a name. However, the way the income for a commission-based employee and a wage-based employee is completely different. The following example captures this idea.

 	function Worker() 	{ 		this.getMethods = function(properties, scope) 		{ 			var $this = scope;  //Store class scope into a variable named $this  			//Iterate through the properties of the object 			for ( var i in properties ) 			{  				(function(i) 				{ 					// Dynamically create an accessor method 					$this[ "get" + i ] = function() 					{ 						return properties[i]; 					};  				//Dynamically create a mutation method that parses for an integer and 				//Ensures it is positive. 				$this[ "set" + i ] = function(val) 				{ 					if(isNaN(val)) 					{ 						properties[i] = val; 					} 					else 					{ 						properties[i] = Math.abs(val); 					} 				}; 				})(i); 			} 		}; 	}  	//The CommissionWorker "subclass" and WageWorker "subclass" 	//inherit the properties and methods of Worker. 	CommissionWorker.prototype = new Worker(); 	WageWorker.prototype = new Worker();  	function CommissionWorker(properties) 	{ 		this.getMethods(properties, this);  		//Calculates income 		this.getIncome = function() 		{ 			return properties.Sales * properties.Commission; 		} 	}  	//Expects the following properties: wage, hoursPerWeek, weeksPerYear 	function WageWorker(properties) 	{ 		this.getMethods(properties, this);  		//Calculates income 		this.getIncome = function() 		{ 			return properties.Wage * properties.HoursPerWeek * properties.WeeksPerYear; 		} 	}  	var worker = new WageWorker( 	{ 		Name: "Bob", 		Wage: 10, 		HoursPerWeek: 40, 		WeeksPerYear: 48 	});  	alert(worker.wage); //Undefined. wage is a private property.  	worker.setWage(20); 	alert(worker.getName());   //Outputs "Bob" 	alert(worker.getIncome()); //Outputs 38,400 (20*40*48)  	var worker2 = new CommissionWorker( 	{ 		Name: "Sue", 		Commission: .2, 		Sales: 40000 	}); 	alert(worker2.getName());   //Outputs "Sue" 	alert(worker2.getIncome()); //Outputs 8000 (2% times 40,000) 

The most important statements from the previous example are:

 CommissionWorker.prototype = new Worker(); WageWorker.prototype = new Worker(); 

This states that for each instance of a new CommissionWorker or a new WageWorker object, the properties and methods of Worker will be passed down to those new objects. These methods and properties can be overwritten within the “subclass” definition if so desired.

Scope

JavaScript exhibits what is known as function scope. This means variables declared in a function are not initially accessible outside the function from which they originate. However, in blocks (such as coniditonal statements), variable declarations or alterations are made available to the calling environment.

 	var car = "Toyota";  	if(car == "Toyota") 	{ 		car = "Toyota - We never stop...and you won't either."; 	}  	alert(car); //Ouputs Toyota - We never stop...and you won't either.  	car = "Toyota"; //Reset car back to original value.  	function makeFord(car) 	{ 		car = "Ford"; 	}  	makeFord(car); 	alert(car); //Outputs "Toyota" because car was altered in the function scope. 

However, if you want a function to alter the value, you can pass in an object as an argument and alter a property of the object.

 	var car = new Object(); 	car.brand = "Toyota"  	function makeFord(car) 	{ 		car.brand = "Ford"; 	}  	makeFord(car);  	alert(car.brand); //Outputs "Ford" 

This is known as passing a value to a function “by reference”. I generally recommend passing by reference only if you are setting up methods within a class and you know what properties the object will contain.

You are now armed with the object oriented basics as applied to JavaScript. Use these principles to simplify your code for projects in the future.