

1stwebdesigner |

| 1st Ideas: Create a Stylish Design Agency Website [Very Detailed] Posted: 14 Apr 2011 03:00 AM PDT Are you in a good mood to make something new for this week’s template tutorial? Today I’m going to show you how to create a stylish agency website. This tutorial will be quite long, just bear with me and I’m sure that by the end of this tutorial, you can create a better version. We will be using gradients mostly, combination of light and dark colors. Let’s get started!
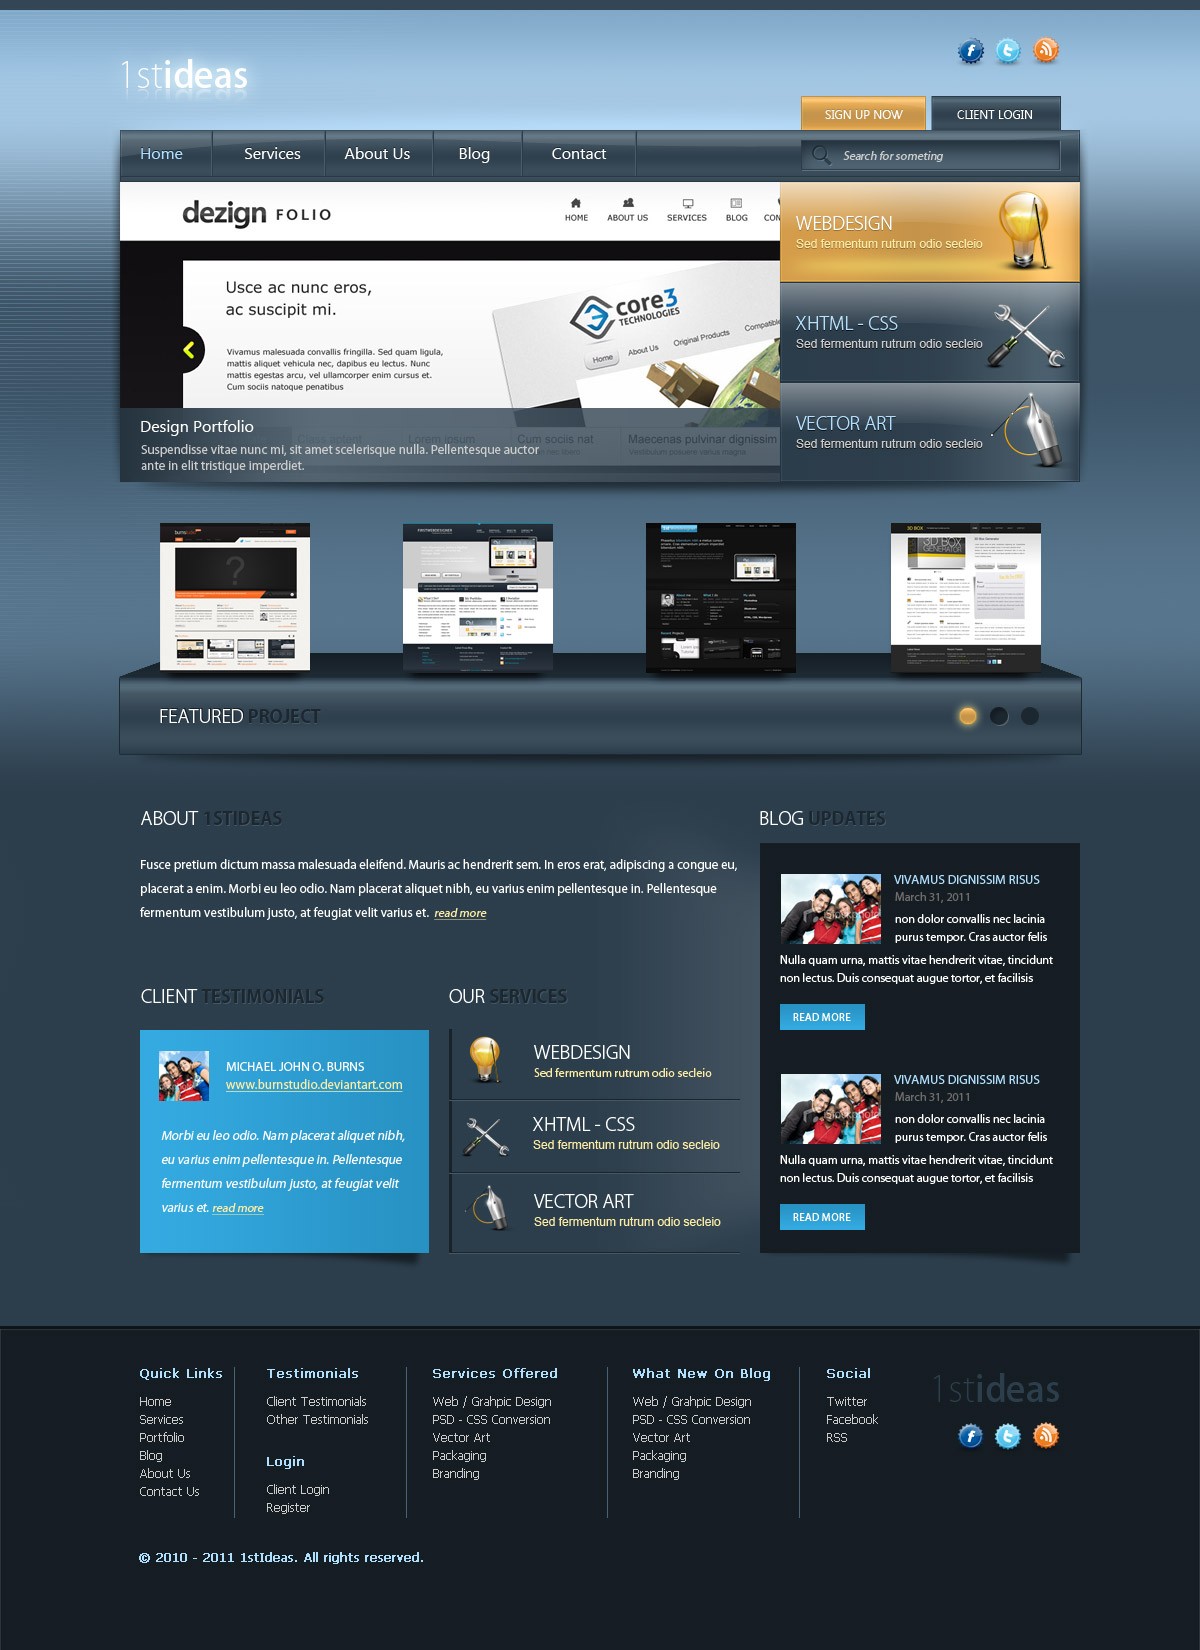
Here is what we will make, click on the image for the full size: Resources to complete this tutorial:Step 1: Setting up the DocumentOpen up Photoshop and create a new document 1200px x 1650px. Make sure that you turn on Rulers by pressing Ctrl + R or by going to View–> Rulers. Creating GuidesI didn’t use the 960 grid system on this tutorial so that we can practice creating our own guides. To show guidelines press Ctrl + ; by default nothing will appear yet because we haven’t created any guidelines yet. Now lets create our first two guides select View > New Guide. This guide will be the holder of the whole layout a total width of 960px. Making FolderTo make things organized and easy to locate, create these folders. Step 2: Working with BackgroundIn the Background folder create a new layer and name it Background. Now select Linear Gradient and use the following colors:
Start dragging from the middle. You may have something that looks like the screenshot below. Creating a Line PatternNext, we will add a pattern to create more texture in our background. Create a new 4 x 4 document. Now select Pencil Tool (B). Follow the screenshot as shown below. To create a pattern make sure you select the top layer and go to Edit > Define Pattern Now lets add a pattern to our background. Create a new layer above the Background Layer and name it Pattern. Select the Paint Bucket Tool (G), switch to pattern, and select the pattern we made. Using Rectangular Marquee Tool(M) select 1/2 of the whole document and fill it with the pattern using the Gradient Tool (G). Add this Blending Option:
Add a mask to the pattern layer by pressing the mask button beside the fx button. Now we will hide the portion of the pattern that we don’t want to appear in the background. Set the foreground color to #000000. Select the Brush Tool(B). Before you start brushing make sure that you select the mask in the layers panel then start brushing areas that you want to hide. Step 3: Working with HeaderInside the header folder create a new layer and name it top. Set the foreground color to #334655. Now create a guide 5px Horizontally. Using the Rectangular Marquee Tool(M) select the top portion within the guidelines and fill it. Before we proceed create three folders name them as shown in the screenshot below. LogoWe will make a quick logo for this tutorial. I’m thinking of something like a glowing logo, I think it suits this layout. So select Text Tool(T) and select your favorite font. I prefer light and bold fonts so I select “Kozuka Gothic Pr6N”. I combined light and bold text. Add this Blending Option:
Duplicate the text layer and transform the original layer by pressing Ctrl + T Right Click and select Flip Vertically, and move it down below the duplicated text. Mask the Original layer and make sure the mask is selected. Select Linear Gradient with a fill color of black and white. Start masking beginning from the middle of the text to top. This will achieve a reflection effect. Social IconsOpen up the social icons that you have downloaded from the resource and place them as shown in the screenshot below. NavigationStart by creating a new layer and name it nav-bg. Create a rectangle shape using the Rectangular Marquee Tool(M) or the Rectangle Tool with a height of 50px and a width of 960px, fill it with any color. Add this Blending Option:
Above the nav-bg layer, create a new layer and name it Shine. Using Pen Tool (P) create a shape and make a selection from it as shown in the screenshot below. Fill it with a white color. Set the layer mode to Screen and Opacity to 10%. Now select the Text Tool(T) and add these links. Duplicate the text layer. Now select the original layer and change the color to #1c2730. Position it 1px above the duplicated layer to make it look like it’s beveled. Now let’s add some dividers between our links. Create another folder and name it divider. Using Line Tool(U) create 2 lines. First line color will be #485d6c, second line color #2b3b48. SearchBefore we make our search bar. Let’s create a new guideline first. Follow the screenshot as shown below. In the search folder create a new layer and name it search-bg. Using the Rectangular Marquee Tool(M) create a rectangle with a width of 260px starting from the 20px guideline we just created. Add this Blending Option:
Now open up the search icon and place it at the right side of the search bg. Add this Blending Option:
I also added an italic Mydrid Pro text color #cccccc. Back to Navigation folder create a new layer above Divider folder and name it below. Using Rectangular Marquee Tool(M) make a selection 5px height 960px width as shown in the screenshot below. Add this Blending Option:
Below nav-bg layer, create a folder and name it Client Login. Inside of it create a new layer and name it button. Using Rectangle Tool(U) create a shape about 130px width and 35px height. Add the same Blending Option as we did in nav-bg layer. In case you didn’t know how just follow the screenshot below. I also added text to the button using the Text Tool(T). I know you’ve learned how to make it look beveled, so I wont repeat it again. Duplicate Client Login folder and rename it Sign Up. Select button layer and change the Blending Options as shown in the screenshot below. Add this Blending Option:
For the text, change the color to #b58742. Step 4: Working with SliderSelect Slider folder and create new folder and name it display. Inside display create a new layer and name it slide-holder, now using Rectangular Marquee Tool(M), create a box with a size of 660 x 300 fill it with #2f404e. Now grab some dummy pictures the same size or bigger than slide-holder. Place it above slide-holder and link them together by pressing Alt + Click on the line in between. Create a new layer and name it Caption, using the Rectangular Marquee Tool(M) create a rectangle with a height of 75px and fill it with any color. Set the layer Opacity to 80%. Add this Blending Option:
Add a caption using Text Tool(T) Hover and NormalInside Slider folder create new folders named Hover, Normal. In each folder create a layer name it bg. Using the Rectangular Marquee Tool(M) create a shape 300 x 100 and fill it with any color. HoverFor the Hover folder bg layer. Add this Blending Option:
Now we will add a shine. Using Pen Tool(P) create a shape as shown in the screenshot below and make a selection from it. Select Linear Gradient, Foreground to Transparent set the foreground to white. Fill the selection with gradient starting from top to bottom and set the layer Mode: Screen, Opacity: 80%. Open up This is Art2 icon set we have downloaded. Re-size it to fit, also using the Text Tool(T) add text as shown in the screenshot below. Create new layer above shine and name it light. Using Elliptical Marquee Tool(M) create a shape as shown in the screenshot below and fill it with #fff070. Go to Blur > Gaussian Blur to 5. Set the layer Opacity: 60%. NormalDuplicate all the layers in Hover folder and place it to Normal folder. All we need to change is the Icon, Gradient Overlay, Stroke, Text and remove the Light layer. Add this Blending Option:
For the text change the color to #afdfff and #cccccc. Shadow and GlowBelow all those folders inside the Slider folder, create a new folder and name it Shadow and also create new layer and name it Shadow-left. Create new guideline as shown in the screenshot below. Select the Rectangular Marquee Tool(M) create a selection from the new guide. Now using Linear Gradient Foreground to Transparent. Set the foreground color to #000000 and fill the selection with a gradient. After filling it erase the portion that is circled as shown in the screenshot below. Repeat this step for Left and Bottom. You may have something that looks exactly as shown in the screenshot below. Create new layer and name it Glow. Set the foreground to #bae0fe. Using the Elliptical Marquee Tool(M) create a selection as shown in the screenshot below and fill it with foreground color. Now add some Gaussian blur radius to 5.0 px.
Step 5: Working with BodyOur Body includes Featured Project, About, Services so go ahead and create those folders separately. Lets first work on Featured Project. Featured ProjectInside the Featured Project folder create new layer and name it holder. Using the Pen Tool(P) & Rectangle Tool(U) create a shape in separate layers as shown below. Name the Rectangle Front and the other to back. For the Front layer. Add this Blending Option:
For the Back layer. Add this Blending Option:
You will hopefully achieve a 3D like effect that looks exactly like the screenshot below. Using the Text Tool(T) I added Featured Project Text with a bevel effect. Just remember to create the bevel effect. If the background is dark and your font is light, the shadow should be dark, and if it is dark then shadow should be lighter. Take a look at the screenshot below and you will know what I mean. Now add some sample pictures for our gallery, it should be 150 x 150. Also, I added some shadow below. Create new folder and name it Circles. Now using the Elliptical Marquee Tool(M) create small circles as shown in the screenshot below. For the first circle. Add this Blending Option:
For the remaining two circles Add this Blending Option:
You should have something that is exactly like in the screenshot below. AboutFor the About folder using the Text Tool(T) add some dummy text. As you can see in the screenshot below I used the same font settings as we did in Featured Project. That’s it for our About folder. TestimonialsIn our testimonial folder Using the Rectangular Marquee Tool(M) create a 290px x 220px box and fill it with #31a5db. Base some other info in the screenshot provided below. As you may have noticed, I added a shadow with an Opacity: 60%. First I used a Pen Tool(P) to create a shape and added a Gaussian blur on it to make it look like a shadow. ServicesIn this step I simply copy the text and icons from our slider we did earlier. For the icons I re-sized them a bit. I also added a 3px #192229 border on each service and separated each with two lines. For the first line the color is #1a242b, second line is #455865. Using the Rectangular Marquee Tool(M) make a selection as shown in the screenshot below. Now set the Foreground to #ffffff and select Radial Gradient Foreground to Transparent. Start dragging from right to left and erase some portion that not included. Step 6: Working with SidebarI don’t need to explain this more, I know you’re already familiar with doing this in the previous steps. Just base it on the screenshot below and I’m sure you can do it on your own. Step 7: Working with FooterInside the Footer folder create new layer and name it bg. Using the Rectangular Marquee Tool(M) make a selection as shown in the screen show below and fill it with #151d23. Add this Blending Option:
Finally using the Text Tool(T) fill the footer with text. I duplicate the logo with no style and color it with #2c3e4c. I also copy social icons and place it below the logo. See the screenshot below for a clearer understanding. We’re done I hope you enjoyed this tutorial and find it useful. If you have any questions or suggestions for the next tutorial just mention it in a comment. I’m here to help and teach you what I know about design. Thank you! Final Design Preview:   |


| You are subscribed to email updates from 1stwebdesigner - Graphic and Web Design Blog To stop receiving these emails, you may unsubscribe now. | Email delivery powered by Google |
| Google Inc., 20 West Kinzie, Chicago IL USA 60610 | |
Comments (0)
Post a Comment