

1stwebdesigner |

| Popup Domination Software Review – Revolution In Email Marketing Posted: 15 Dec 2010 01:00 PM PST In internet marketing it's all about the traffic and the people you can reach. One of the best ways to reach people is by having an email newsletter. But how to make people willing to subscribe to your newsletter? One of the ways is to offer a high quality product in exchange for their email addresses. This is where Popup Domination comes handy. Continue reading to find out what is this WordPress plugin (actually it works on all sites) about, what it does and why do you need it. So What Exactly Is It?Popup Domination is a powerful WordPress plugin for attracting email subscribers. It creates a lightbox based pop-up window which helps to increase opt-in email list conversion on your blog. Popup Domination installation comes together with 4 beautiful high converting themes, 15 different colour combinations and 8 button variations. The good thing is that you don't need any knowledge coding at all. Just like most of the WordPress plugins this one ain't no exception and does all the work for you. Simply customize the settings and with a click of a button, your interactive plugin is ready. Why Do I Need It?If you want your online business to be successful, having a large audience is crucial. And as you may know, reaching and building trust to your audience isn't an easy job. One of the best ways to do build it is to have a mailing list. This is where Popup Dominations comes handy. The principle is that you have to be able to give something to your readers, so they would be interested in sharing their email with you. Here are some of the features you'll find on Popup Domination 2.0:
Unlike 1.0 version, in this one there are included both a WordPress plugin and a brand new standalone version which means you can enable PopUp Domination on any website.
The standard Popup Domination installation comes with 7, yes 7 themes and 15 different color schemes. All of which are unique and fully customizable.
All you need to do is input the HTML generated and you are good to go.
Developers had listened to feedback and worked hard with this feature.. Theres more themes, more options and more functionality. You can check out the video on their homepage for a complete run down of the new features.
Within the WordPress plugin you can choose exactly which pages and posts you want PopUp Domination.
Only show PopUp Domination once you have receive a certain number of impressions from a particular user. It’s really easy to set-up and customize. You can fully customize this plugin without leaving your WordPress admin panel. Templates, colors schemes and text fields are easily editable. If you’re more experienced user, you can access to CSS files and edit the plugin beyond recognition. SummaryBriefly, I want to say that Popup Domination is a great and worthy plugin which will be appreciated by marketing veterans and rookies as well. Easy customization and user-friendly design makes it one of the best this kind of plugins in the game. It can be priceless investment to your online business. So whether you are an online marketing expert with years of experience or just a newcomer, Popup Domination is the must have a thing for your toolkit. I have bought and tested Popup Domination myself, not using for 1stwebdesigner yet because still I think it’s a bit too proactive way for getting subscribers, but very effective one, I think it would be good to not receive this pop up once you’ve subscribed, but I don’t know if there is any chance to recognize already subscribed person. But for short time effective marketing definitely must have plugin in your toolbox. If you want to get Popup Domination and learn more about it, you can do it by clicking here. It’s not a cheap plugin though, now it costs 77$, but true marketers will evaluate its functions and will do anything to increase their mailing list to eventually increase their own earnings. If you have a bigger subscriber count, usually it also means better chance to actually sell something to them. The same is with website – if you have a great website but no one knows about it, you don’t earn anything and don’t have any exposure. Do something about it and convert your loyal readers to even more loyal followers in your mailing list. I hope this informative promotional article helped you to evaluate good plugin and email marketing at all! Take care!    |
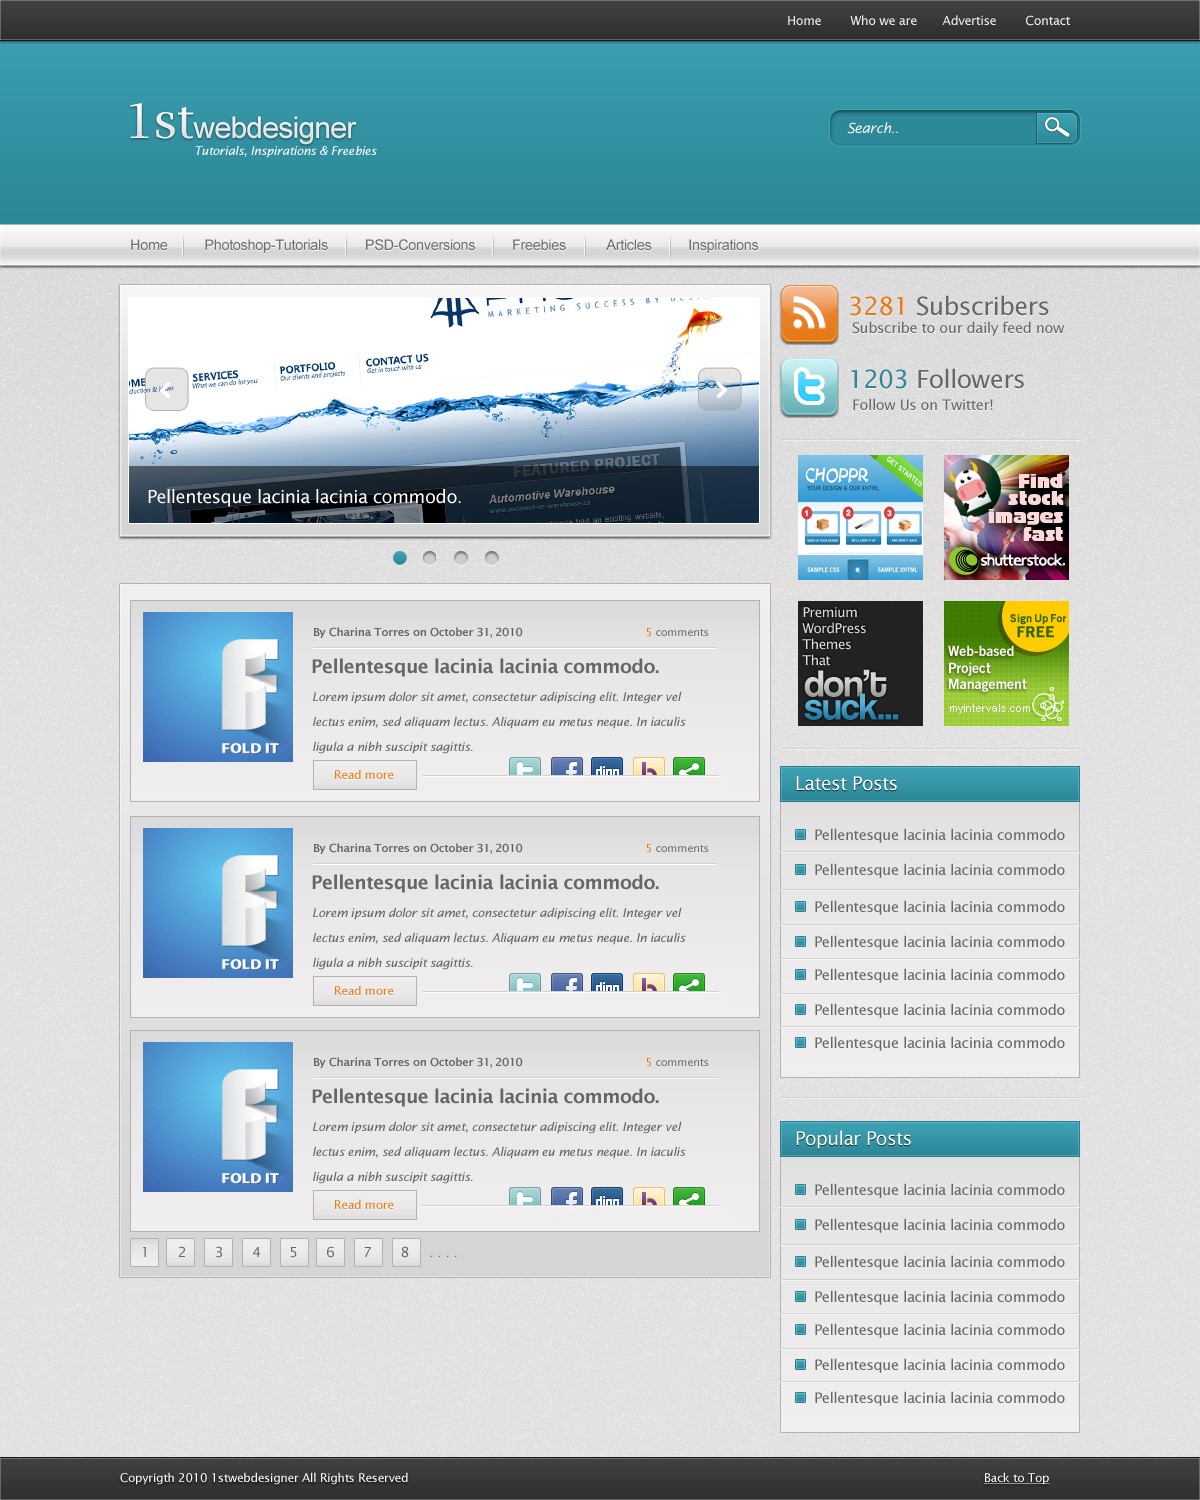
| Create A Detailed Blue WordPress Blog Layout In Photoshop Posted: 15 Dec 2010 02:00 AM PST Hello there everybody and welcome to another PSD web design here at 1stwebdesigner. In my previous tutorial we learned how to create a Dark WordPress style layout. Today you will be learning to create a clean light WordPress style layout and I hope all of you can follow this step by step tutorial. Let’s get started. Resources you will need to complete this tutorial: Here is what we will making, click on image for full preview: Before we get started download first 960grid system for easy guideline creation.
Step 1: Working with HeaderLets make this tutorial organized. Rename the Layer1 folder to top_header and also rename the layer1 to top To start will make some guidelines for our header. Select Rectangular Marquee tool(M) make a selection from the guide we have just created. Add this Blending Option: Drop Shadow
Inner Glow
Gradient Overlay
To finish the top_header select Text Tool(T), put some links at the right side. Step 2: Working with Site Name and Search BarCreate a new layer below the top layer, name it header_bg Create a new guide 225px horizontally, make a selection and fill it with any color. Apply this Blending Option Gradient Overlay
Using Text Tool(T) Add the Site Name and Slogan follow the image bellow 1st
webdesigner
Tutorials, Inspirations & Freebies
Apply this Blending Option: Drop Shadow Inner Glow Gradient Overlay
Now lets create the search bar. Create another folder inside the Header name it Search, put all your search related layers there. Select Rounded Rectangle Tool(U) and set the radius to 10px. Place it as shown below and name it nav_bg. Add this Blending Option Drop Shadow
Inner Shadow
Gradient Overlay
Result:
This means that whatever you selected will not be included to the selection. Hit Delete then Name the layer search_btn:
Add this Blending Option: Inner Glow
Gradient Overlay
Stroke
To add the search icon select Custom Shape Tool(U) and find the search icon. Place the icon in the button of the button we have created. Add this Blending Option: Drop Shadow
Use Text Tool(T) to add text:
Step 3: Working with NavigationAt the layers panel make a new folder above the top_header folder name it Navigation, put all your search related layers there. Make a new guideline 265px orientation to Horizontal. Create a new layer and name it nav. Make a selection to our new guideline and fill it with a color. Apply this Blending Option Drop Shadow
Inner Glow
Gradient Overlay Stroke
Create new layer above the nav layer and name it shine. Fill it with white and change the blend mode to Softlight, Opacity to 75% Using Text Tool(T) Add links to our navigation as shown. Duplicate the text layer. Move the original text 1 below by hitting the arrow down once. Then change the color to White and you get nice embedded text. Result: Now lets create a divider for our Navigation. Set the foreground color to white.
Duplicate the divider and move 1 from right by pressing the right arrow key. Apply this Blending Option: Color Overlay
Merge the two layers and duplicate it 4 times. Don’t forget to group the layer and name it dividers. Step 4: Working with Body BackgroundCreate a new folder below the top_header name it body_bg. Inside it create a new layer name it noise and fill the layer with Black. Go to Filter > Noise > Add Noise. Set the blend mode to screen Create a new layer below the noise layer and name it gradient. Select the Gradient Tool(G) Set the Foreground color to #d6d5d6 background to #e1e0e0 While holding the Shift key drag it from top to center of the page. Step 5: Working with Featured ContentAt the layers panel make a new folder name it featured_content, put all your featured content related layers and folders there. Show the guideline by pressing CTRL + : Follow the image below to make guidelines: Select Rectangular Marquee Tool(U) and make a big rectangle as show below and fill it with black color. Apply this Blending Option: Drop Shadow
Inner Glow
Gradient Overlay
Stroke
Grab a sample screenshot make it 630 x 225. Apply this Blending Option Stroke
Select Rectangular Marquee Tool(M) make a selection as shown below and fill it with black color, set the fill to 50%. Using Text Tool (T) add some text:
Now we will create Next and Prev Buttons. Select Rounded Rectangle Tool(U) Set the radius to 10px. Set the fill to 10%. Apply this Blending Option: Stroke
Adding arrow - select Rounded Rectangle Tool(U) do the following step. Apply Color Overlay make it white. Duplicate the whole layer and make another button in the opposite side. Don’t forget to name every button. What we do next is adding sliding option, so people could switch screens: Create a new folder and name it circles. Select Eliptical Marqueee Tool(M). Make four circles. The first circle will serve as active/hover state, so apply this Blending Option to it: Drop Shadow
Gradient Overlay For the unhover circles add this option: Drop Shadow
Inner Shadow
Color Overlay
Step 6: Working with PostsCreate a new folder and name it posts. Create a new layer there and name it posts_holder. Select Rectangle Tool(U) and draw a big holder for our post. Apply this Blending Option to it: Inner Glow
Gradient Overlay Stroke
Create another box as shown in the image below. This will serve as the background of every post. Apply this Blending Option: Gradient Overlay Stroke
This is how our posting will look like: Follow the image shown below and add all the options to your own design: For the read more button you’ll need to add this:
Open up social network icons and place it as shown in screenshot below. Add a divider at the top of the icons Select Rectangular Marquee Tool(M) make a selection as shown. Fill it with color #efeeee. Group all the layers and name it posts and duplicate it 3 times. Below our last post we will make a pagination buttons. Select Rectangle Tool(U) and make a box as shown in the screenshot below. Apply the same layer style as we did to our read more button, for the gradient uncheck Reverse. Duplicate a couple of times and place it beside with each other. Use distance 5px and for the gradient check Reverse. Using Text Tool(T) put up numbers. I used the same font color #676666 Step 7: Working With Right Sidebar(RSS, Twitter, Advertisement, Newest Posts, Popular Posts).At the layers panel make a new folder name it right_sidebar, put all your sidebar related layers and folders there. Rss Lucida Sans Regular 25pt color #e67a18 (Drop shadow 1px white blend mode to overlay) Lucida Sans Regular 25pt color #2c8797 (Drop shadow 1px white) Notice I’ve add some divider about 20px below. The same step and color as we do previously in our posts. Or simply just duplicate some divider. For the advertisement Grab 125×125 advertisement images, use 20px distance with each other. For the Latest Posts Select Rectangle Tool(U) and draw as shown below in the screenshot. Apply the same style we used in post_bg but this time change the stroke color to #b2b2b2 position inside. Draw another rectangle that will serve as our header for the box as shown below in the screenshot. Apply following blending options to it:
Add text for the header also for the post, follow the image below for details. Draw a little square which will serve as a bullet. Apply the same layer style as we used to our header. Group all the layers name it latest_posts. Duplicate new group and name it popular post. Hold SHIFT and drag it below. Name it popular_posts, Step 8: Working with FooterAt the layers panel make a new folder and name it footer, put all your footer related layers and folders there. Select Rectangular Marquee Tool(M) and make a selection as shown in the screenshot, fill it with black color. Apply the same layer style as we did in our top_header. Using Text Tool(T) add some text 12px color to white. Apply this Blending Option to it: Drop Shadow Now we're done for now – congratulations!!! I really hope you enjoyed this tutorial and will keep coming back for more. If you have any tutorial request related to web design feel free to comment it below – I would be happy to fulfill your needs. Any question or suggestions? Please do leave your comment to let me help you too. Thanks!  |


| You are subscribed to email updates from 1stwebdesigner - Graphic and Web Design Blog To stop receiving these emails, you may unsubscribe now. | Email delivery powered by Google |
| Google Inc., 20 West Kinzie, Chicago IL USA 60610 | |
Comments (0)
Post a Comment