

1stwebdesigner |

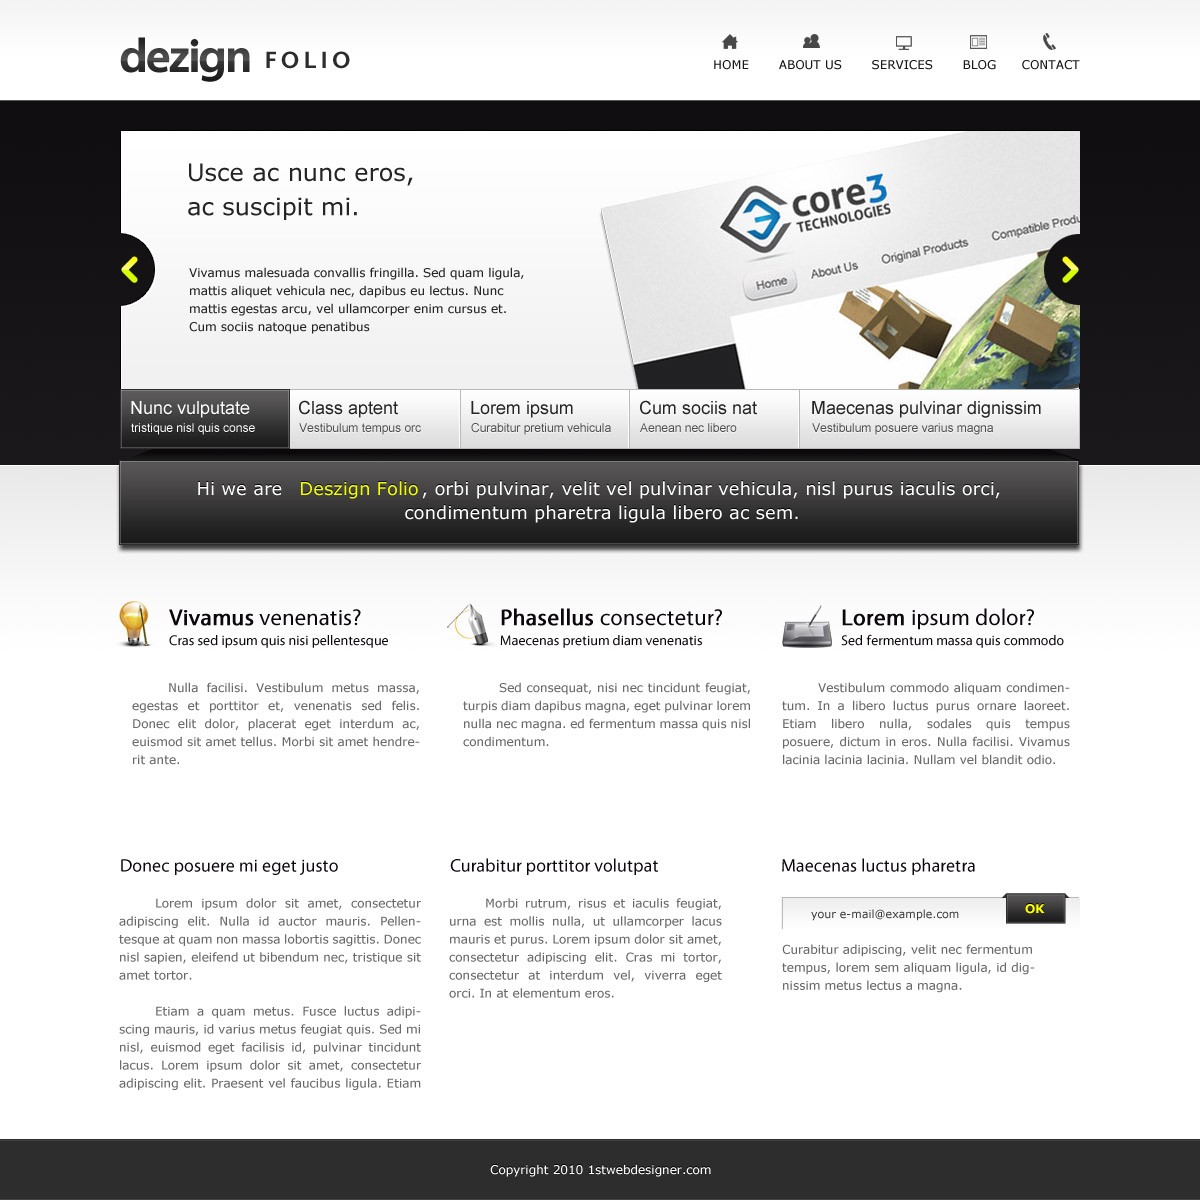
| Dezign Folio: Create A Detailed Portfolio Homepage Design In Photoshop Posted: 02 Feb 2011 02:00 AM PST In this tutorial you will learn how to create a Portfolio homepage design with a unique slide show and welcome message design. Also choosing great resources around the web to make our design more cooler. I Hope that you can go through in this tutorial and learn a few techniques.
Resources you will need to complete this tutorial:Here is what we will making, click on image for full preview: Step1: Working with Site StructureBefore we get started download first 960grid system for easy Guideline creation. Open 960_download\templates\photoshop\960_grid_12_col.psd We also need to make sure that our Rulers and Guides are viewed. By pressing
CTRL + SHIFT + C to change the canvas size. Using the Paint Bucket Tool(G) fill the background layer to #242b30 Now you need to create a folders. Here is the folders that we will use in order to be organized. Step2: Working with HeaderMake sure that you have downloaded all the resources. Create a new layer inside the header folder and nae it toe header_bg (Make sure that you have finished creating the folders as said earlier). Now create a new Guideline to do this go to View > New Guide, set the value to 100px and set the Orientation to Horizontal. Select Rectangular Marquee Tool(M), make a selection as shown in the screen shot below. Now set the foreground #f4f4f4, background #ffffff. Select Linear Gradient drag it by starting at the top down to the middle of the section . LogoStill we were working on the Header folder, create a new folder and name it to Logo. Make sure you installed the Vegur font that you have downloaded. Follow the text formatting as shown in the screen shot below. Add this Blending Option Drop ShadowGradient OverlayColor Used
Apply this styles to both texts NavigationCreate a new folder and name it to Navigation. We will be putting our navigation links and place each icons “108 Mono Icons by Tutorial9″ for its desired link , so grab text tool and place it as shown in the screen shot below. Add this Blending Option to the Icons Let see what we have on this step. First we created our header background adding up our Logo using the Veguar font we style it by the power of Blending Options, here we can style it uniquely. Next we added our Navigation menu using simple text and Icons from Tutorial9. Thats it for our Header section. Step3: Working with SlideshowPreview of what we will making Let’s work on first with the dark background. Create a new layer inside the Slideshow folder and name it slide_bg. Next create a new guide Value to 465px, Orientation to Horizontal. Make a selection starting below our header down to the guideline. Now select Linear Gradient, set the Foreground to #0f0e0f and Background to #1a181a start dragging from the top down to the bottom of the selection. Create a new layer and name it slideshow_holder. Next create a new guideline as shown in the screen shot below. Select Rectangle Marquee Tool(M) make a rectangle at the center of the guideline and fill it with white. Add this Blending Option Inner GlowGradient OverlayColor Used
StrokeNow we will delete some area in our slieshow_holder to place our Next and Previous buttons. Select Elliptical Marquee Tool(M) and make a selection as shown in the screen shot below. Do this in both sides. Next and Previous ButtonsCreate a new folder and name it to Arrow. Select Rounded Rectangle Tool, radius to 10px and follow the screen shot as shown below. Place this icons both sides. Add this Blending Option Gradient Overlay
Now add up some text with the font choice of yours and also grab some image for the slide show. TabsCreate a new folder and name it Tabs. For the background of the tabs select Rectangular Marquee Tool(M), place it as shown in screen shot below and fill it with white. Add this Blending Option Gradient Overlay
Stroke
Inside the Tabs folder create another folder and name it to hover. Select Rectangular Marquee Tool(M), place it as shown in the screen shot below and fill it with black. Add this Blending Option Inner GlowGradient Overlay
Stroke
Select Text Tool(T) and add this text formatting. Create another folder and name it to Normal, Select Text Tool(T) and add up texts with the same formatting. Also I added a Divider. Follow the screen shot as shown below. Let see what we have on this step. We started our slide show by doing first its background follow by the holder of the entire slide show. Next thing we have done is putting up some text and image to contain the slide, then we added Tabs a design for active/hover and the other is styled in a normal state. Welcome MessageStill were in the slide show folder. Create another folder and name it message. Now select Rectangle Tool(U), place the shape as shown in the screen shot below. Add this Blending Option Drop ShadowInner GlowGradient Overlay
Stroke
Notice in the Preview of the Welcome Message it looks like it is hanging, so to do that select Pen Tool(P) and create a shape both sides as shown in the screen shot below. Make a selection of it. Set the Foreground to 0a090a, Background to #1b1b1b. Select Linear Gradient and start dragging from the top down to the bottom of the selection. Add this Blending Option Stroke
You may have something that looks like this Now were going to add the message, so select the Text Tool(T) and put up you message with the same formatting as shown in the screen shot below.
In this step we styled the welcome message to make it looks like its hanging on the design. With the help of the dark background and Drop Shadow we achieve this hanging effect. Also we styled our text to make it looks like beveled effect by duplicating the text place it at the back of original, make the text darker and move it up once by the use of the arrow key. Step4: Working with ServicesPreview of what we will making In the Services folder create another folder and name it to Service1. Open up “This Is Art2″ and select some icons that is appropriate to each services. Now select Text Tool(T), follow the placement and the formatting as shown in the screen shot bellow. When you’re done duplicate it 2 times then change it texts and icons. Now were going to add a background to our services section to make it more nicer. Select Rectangular Marquee Tool(M), make a selection as shown in the screen shot below. Select Linear Gradient, set the Foreground to #f4f4f4 and Background to #ffffff, start dragging from top down to bottom of the selection. In this step we simply grab some nice Icons, style our text with a proper font, font size, colors and by the use of proper alignment of texts. Step5: Working with InformationPreview of what we will making In the Information folder create a layer and name it to background. Select Rectangular Marquee Tool(M), make a shape and fill it with #eaeaea Add this Blending Option Inner GlowStroke
Now were going to add the site Information. Select Text Tool(T), follow the formatting and place it as shown in the screen shot below.
Create another folder and name it RSS Subscribe. Select Rectangle Tool(U), create a shape color to #b7b7b7 as shown in the screen shot. Duplicate the shape. By the use of arrow key move it 1px to the right and 1px to the bottom. Add this Blending Option Gradient Overlay
You may have something that looks like this Select Rectangle Tool(U), create a shape and place it as shown in the screen shot. Add this Blending Option Drop ShadowInner GlowGradient Overlay
Stroke
In this step we just copy the text formatting of what we have done on our services area. Also we create an RSS Subscribe area where we style the subscribe button looks like it is hanging the same as we did to our Welcome Message Step5: Working with FooterSelect Footer folder and create a layer name it foot_bg. Using Rectangular Marquee Too(M) cover all the remaining white space below the information area and fill it with #1d1d1d. Add this Blending Option Inner GlowStroke
To finish the design add up your copyright text using Text Tool(T). Conclusion:I really hope that you follow and learn something from this tutorial for your future projects. If there are some steps that you didn’t understand feel free to ask some question below. Also if you like this tutorial please share it to your friends and don’t forget to subscribe to our news letter. Have a great day!.    |


| You are subscribed to email updates from 1stwebdesigner - Graphic and Web Design Blog To stop receiving these emails, you may unsubscribe now. | Email delivery powered by Google |
| Google Inc., 20 West Kinzie, Chicago IL USA 60610 | |
Comments (0)
Post a Comment