

1stwebdesigner |

| Create a Fantastic Landing Page for Your Next Product Using Photoshop Posted: 07 Feb 2011 02:00 AM PST Let us start the week with another PSD tutorial here at 1stwebdesigner! We will create a Product layout using Photoshop in a step-by-step manner. Techniques will be discussed in this tutorial which include the use of proper spacing, typography, and colors. Keep in mind that these techniques can also benefit you when you’re working on other designs in the future, so keep your mind focused and do not skip a single word!
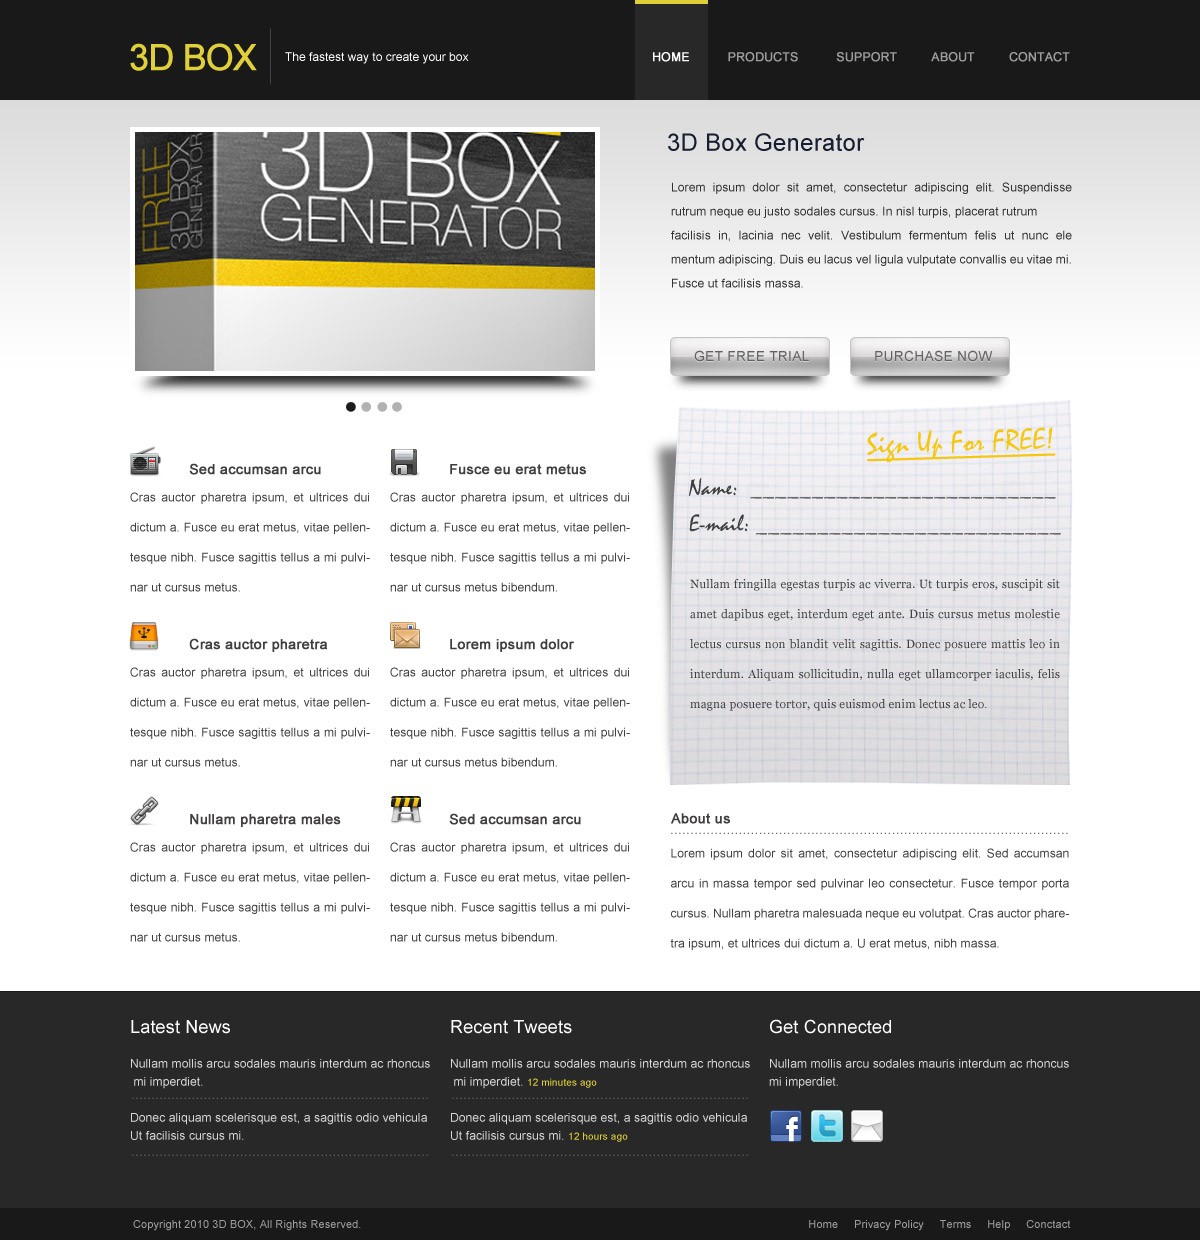
Resources you will need to complete this tutorial:Here is what we will be making, click on the image for a full preview: Step 1: Working with the Site StructureBefore we get started, download first 960grid system for easy Guideline creation. Open 960_download\templates\photoshop\960_grid_12_col.psd We also need to make sure that our Rulers and Guides are visible by pressing
CTRL + SHIFT + C to change the canvas size. Step 2: Working with the HeaderRename layer1 folder (group) Header, create a new layer and name it header_bg (Create groups for every major section for example you should group: Header, Navigation, Footer layers together to help stay better organized). Create a new guideline go to View > New Guide and set the position to 100px, orientation to horizontal. Select Rectangular Marquee Tool(M), make a selection as shown in the screen shot below and fill it with #191919 Step 3: Working with the LogoCreate a folder inside Header group and name it Logo, put all your logo related layers there. Select Text Tool (T) and put up your Site Name and Slogan.
Separator line: Select Line Tool(U) color #414141. Step 4: Working with NavigationCreate a new group and name it Navigation, put all your navigation related layers there. Select Text Tool (T) and add the following text: HOME, PRODUCTS, SUPPORT, ABOUT, and CONTACT. Create a layer and name it Hover. Select the Rectangular Marquee Tool(M), make a selection as shown in the screenshot below and fill it with #282828 Create another layer at the top of the Hover group. Follow as shown in the screenshot below and fill it with #dfce3e Step 5: Working with Featured SectionCreate a new group and name it Featured_Section, put all your Featured-related layers there.
Create another layer and name it img_holder. Select the Rectangular Marquee Tool (M), make a selection as shown in the screenshot below and fill it with #414141. Add this Blending Option Stroke Open up the 3dbox generator you have downloaded. Create another layer at the top of img_holder and name it img. Alt + Click between the two layers to link the img to img_holder. Below the img_holder create another layer name it shadow. Select the Rectangular Marquee Tool(U), make a selection as shown in the screenshot below and fill it with #000000. Ctrl + T to transform. Now, Left Click and choose perspective. Go to Filter > Blur > Gaussian Blur. Select the Text Tool (T), Grab some lorem ipsum text. Follow the text format as shown in the screenshot below. Select the Elliptical Marquee Tool (M), make 4 small circles as shown in the screenshot bellow and fill it with #b2b2b2. For the hover fill it with #1b1b1b. Step 6: Working with ButtonsCreate a new group and name it button, put all your button-related layers there. Select Rounded Rectangle Tool (U), set the Radius to 5px. Create a layer named btn_bg. Add this Blending Option Inner Shadow Gradient Overlay
Stroke Select Text Tool (T) Create another layer at the top of btn_bg and name it shine.
Now let’s make a shadow on our button. Repeat the same step as we did on our slide show shadow. Step 7: Working with FeaturesCreate a folder named Features, put all your features-related layers there. Open up the icons you have downloaded. Grab 6 icons that you like. Place it as shown in this screenshot below and follow the text format. Step 8: Working with NewsletterCreate a new group and name it news_letter, place all your newsletter-related layers there. Create another layer named news_bg Select the Rectangular Marquee Tool (M), and make a selection as shown in the screenshot below. Select the Gradient Tool (G), set it to Pattern.
Add this Blending Option Gradient Overlay
CTRL+ T to transform, right-click and choose warp. It’s up to you how you do the warping. In the image below I curve a little at the top left and a tiny curve on the right side and bottom. Create another folder below new_bg and name it Shadow Select Pen Tool(P), make a shape as shown below and fill it white #000000. Go to Filter > Blur > Gaussian Blur. Set the shadow layer opacity to 50%. Now Select Text Tool (T), follow the text format as shown in the screenshot below.
Step 8: Working with About UsCreate a folder named About_us, place all your about us related layers there. Now Select Text Tool (T), follow the text format as shown in the screenshot below. Step 9: Working with FooterCreate a new group and name it Footer, put all your footer related layers there. Create a guideline 990px, horizontal. Make a selection as shown in the screen shot below and fill it with #282828. Create a folder named Latest News. Select Text Tool (T), follow the text format as shown in the screenshot below. Create a folder and name it Recent_tweets. Select Text Tool (T), follow the text format as shown in the screen shot below. Create a folder and name it Get Connected. Open up the social icons you have downloaded and grab Facebook, Twitter and Email. Select Text Tool (T), follow the text format as shown below. Select Rectangle Tool (U), set the color to #191919 and place it as shown in the screenshot below. I also added copyright text and some footer links using Text Tool (T) 11pt color #9d9d9d Done! I hope you learned something new here. Don’t forget to comment and suggest better ways on how to do things! If you have a tutorial request, or a question feel free to leave them as a comment below. Thanks! Final Preview   |


| You are subscribed to email updates from 1stwebdesigner - Graphic and Web Design Blog To stop receiving these emails, you may unsubscribe now. | Email delivery powered by Google |
| Google Inc., 20 West Kinzie, Chicago IL USA 60610 | |
Comments (0)
Post a Comment