

1stwebdesigner |

| Burnstudio: Create An Amazing Personal Website From Scratch Using Photoshop Posted: 15 Feb 2011 02:00 AM PST Have you ever had a hard time designing your own personal website? Thinking of what elements, shapes, font styles will suit your design? Now if you are in the mood to do something new today, I’ll guide you in creating a stylish personal website. We will be using mostly shapes, layer styles, and fonts to create a new personal website. Hope you can follow along with this tutorial. Now let’s get started.
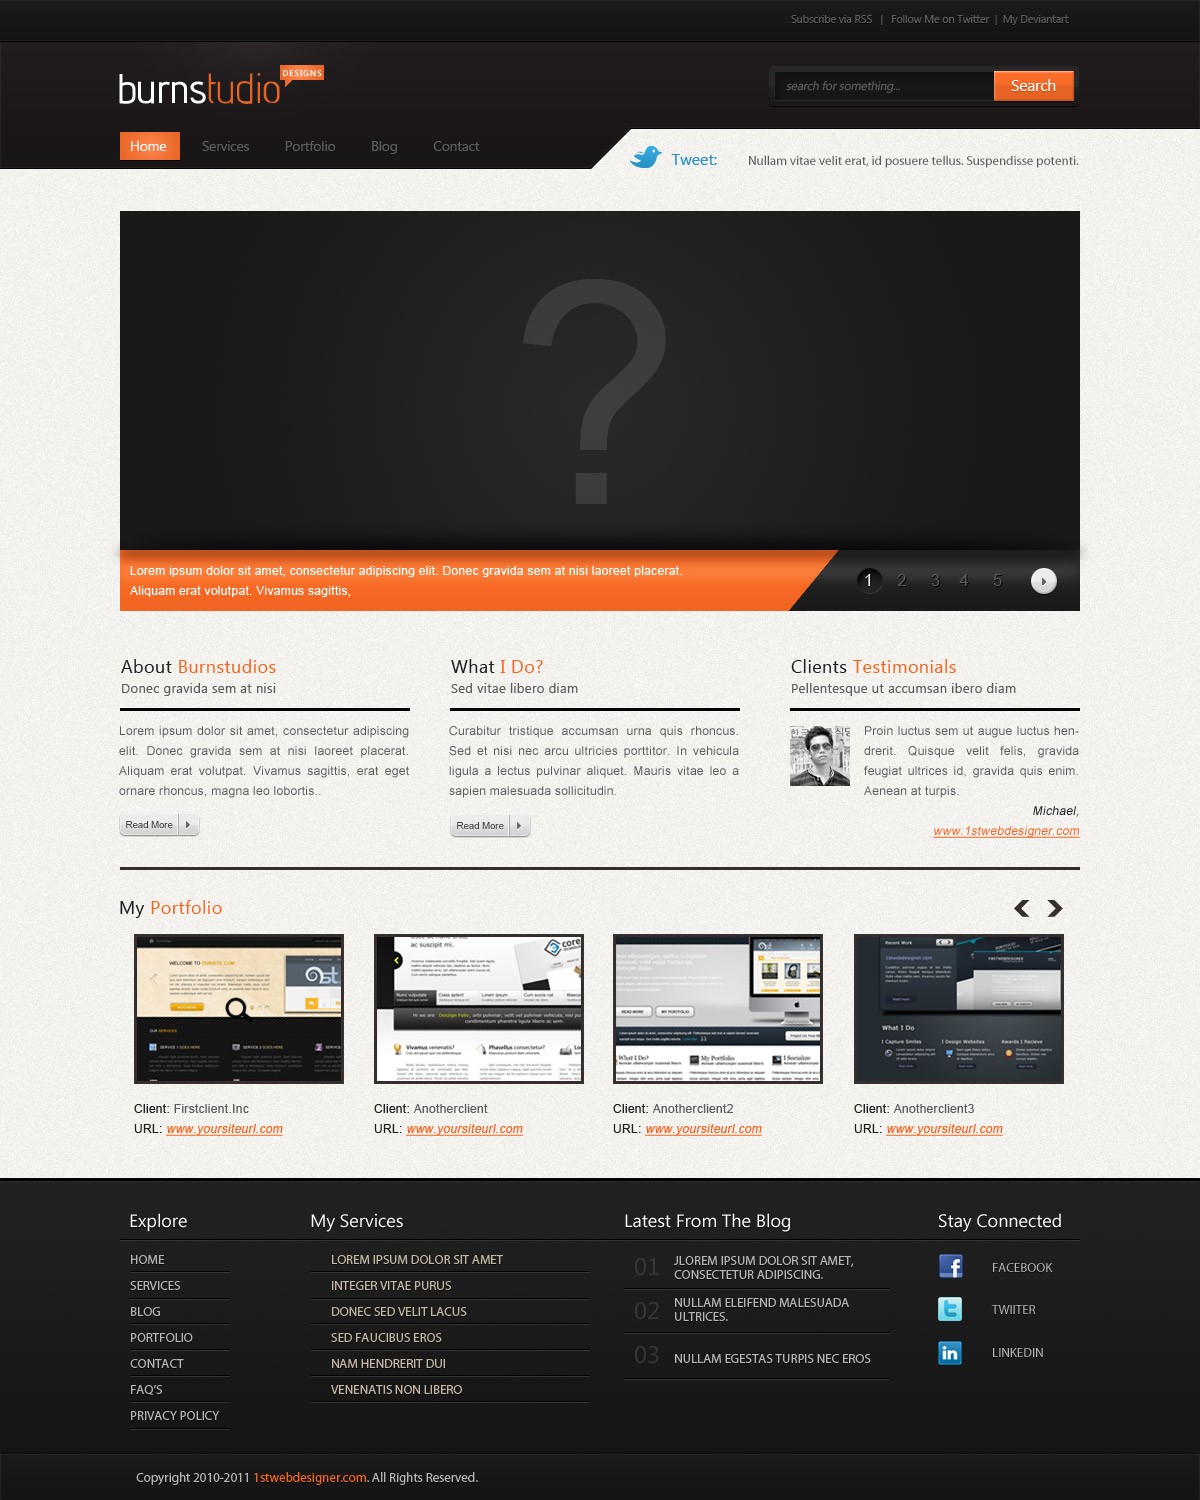
Here is what we will be making, click on the image for full preview: Step 1: Download ResourcesStep 2: Setting The Document SizeIn the Downloads folder or on your Desktop open up "960_grid_24_col.psd". First we need to change the canvas size, hit CTRL + ALT + C to access the canvas size option and change the width to 1200 px and height to 1500 px. Make sure to be using pixels as your measurement. We also need to make sure that Rulers and Guide Lines are visible. Go to View and check Rulers, Guide, and Snap. Now follow these instructions and place New Ruler Guides at:
Step 3: Creating The BackgroundFill the background layer with #f3f2ee. Now lets add some texture to it, go to Filter > Noise > Add Noise Step 4: Organizing The Folders/GroupsIt is important to make the Folders/Groups organized in order for the developer to easily locate the elements of the site, or for the future redesigning of the site you, as a designer, can easily locate the elements you may want to change. Create new Folder(s)/Group(s) and name them as shown below. Step 5: Creating the Header AreaTop HeaderInside the Header folder create another folder and name it Top Header. Now create a new layer and name it thead, make a selection from the first guide starting from the left across to the right fill it with any color for now. Select Type Tool(T) and type text as shown in the screen shot below according to its character settings.
Add this Blending Option to thead layer.
HeaderCreate another folder inside header folder and name it header. This folder contains these folders: Logo, Latest Tweet, Navigation, and Search. Create a new layer and name it header_bg. Select Pen Tool(P), make a shape as shown in the screen shot below and fill it with any color. Add this Blending Option
LogoIt’s time to add our Logo, so grab the Type Tool(T) and type the logo according to its character settings. Color used for the logo #ffffff and #e66324. Grab the Pen Tool(P) to create that little shape, fill it with #fb824a and label it design using Type Tool(T). NavigationNow lets create our navigation, select Type Tool(T), add the following links according to the settings below. Using the Pen Tool(P) create a shape as shown in the screen shot below that will serve as a hover or active state, and fill it with any color. Add this Blending Option
SearchTo create the search form first thing we need to do is to select Rounded Rectangle Tool(U), create a shape as shown in the screen shot below and fill it with any color. Add this Blending Option
Create another shape now using the Rectangle Tool(U)
Create another shape for the button. Add this Blending Option
Using the Type Tool(T) type the following: Tweet FeedTime to put up our Tweet Feed. Select the Type Tool(T) type “Tweet Feed:” and a sample latest feed. Also open up the twitter icon and place it beside the text. I added this Blending Option to the Twitter Icon Step 5: Creating The SlideshowThe first step is to create a big box using the Rectangular Marquee Tool(M). Change the Foreground color to #282828 and Background to #191919. Now select Radial Gradient and fill the selection starting from the center. Using the Rectangular Marquee Tool(M) create another shape and fill it with any color. Add this Blending Option
Using the Pen Tool(P) create a shape and fill it with any color. Add this Blending Option
Now above the two shape layers create 2 layers and name them Light and Dark. Now select the Rectangular Marquee Tool(M) and make a selection and fill it with #ffffff. Add a Gaussian Blur to the layer, to do this go to Filter > Blur > Gaussian Blur. Set the layer mode to Soft Light and Opacity to 50%. Now select the Dark layer and create a shape using the Rectangular Marquee Tool(M) and fill it with #000000. Add the same amount of Gaussian Blur but this time set the Opacity to 80%. Below the Orange and the Black colors we will add a background shadow. So create a new layer below it, select the Elliptical Marquee Tool(M). Add a Gaussian Blur Radius: 6px. Using the Type Tool(T) and the Elliptical Marquee Toll(M) create what is shown in the screen shot below and make sure that it is on a separate layer. On the left side I used 12 pt Arial. On the right side I used 16pt Arial. The first circle will serve as the hover/active state. Add this Blending Option
The second Circle will be the next button. Add this Blending Option
I added a small arrow to the second circle using the Pen Tool(P) with fill color #606163. Duplicate it and move the original layer once using the down arrow key. Also, for the text, I duplicated it and changed the color to #5d5d5. I colored number 1 with #ffffff. With this step it will give the arrow and the numbers an embedded or letterpressed effect. For this tutorial I will not add any slide images. So it’s up to you to add your own. Step 6: Creating 3 Columns (About, What I Do and Testimonials)Inside 3 Columns folder create 3 folders and name them About, What I Do and Testimonials. Now we’re going to add our About information, so select the Type Tool(T) and type your information. Notice that line. I used Line Tool(U) 3px color #000000. Read More ButtonCreate a new folder and name it Read More. Using the Round Rectangle Tool(U) with a radius 5px create a shape and fill it with any color. Add this Blending Option
Using the Type Tool(T) and the Pen Tool(P) I added ‘Read More’ and an arrow shape. You can just duplicate the arrow shape as we did in our slide show. Again you can use the same technique to achieve an embedded effect, just duplicate each layer. The original layer must move once using arrow key and change the color to #ffffff.
Time to add a separator to separate the text and arrow. Using Line Tool(U), add 2 lines the first line must have a fill #ffffff and the second #aeaeaf. Nice and sexy eh? Now lets proceed to What I Do. What I DoFor this step simply duplicate all the elements inside the About Folder and move it to What I do Folder, then change the Heading and Information. TestimonialsJust duplicate again. I added a 60×60 image and added italic text and aligned it to the right. Step 7: Creating My PortfolioIn this step we are going to display our best designs. To start select the Type Tool(T) and type “My Portfolio” then add a 3px line color #000000 as shown in the screen shot below. Now were going to add thumbnails for our design images. Create a new folder and name it Thumbnails. Now what you’re going to do is create a new file (CTRL + N) 210 x 150 in this file you’re going to create 4 thumbnails with your chosen images. When you’re done drag it to our canvas and place to the Thumbnails folder. I added a Stroke to each thumbnail. Now were going to add a Client Name and Website URL below each thumbnail. So, select the Type Tool(T) and type some dummy text. Last thing we’ll do for the Portfolio section is add a previous and next button at the right top corner. Select the Shape Tool(U) select an arrow from the list of shape and fill it with #362f2d. Step 8: Creating The FooterInside the Footer folder create a new layer and name it footer_cont. Now select the Rectangular Marquee Tool(M) and create a big rectangle selection from the guide. Set the Foreground color to #151515 and Background to #212121. Select Linear Gradient(G) and drag starting from the bottom up to the top of the selection. Add this Blending Option
We will divide our footer area into four columns, so inside the Footer folder create 4 folders and name it Explore, My Services, Latest Frog The Blog and Stay Connected. Lets work first on heading titles. Using the Type Tool(T) type your heading. I added a drop shadow in each header Add this Blending Option
ExploreLets work on Explore folder. Using the Type Tool(T) type create another section heading for Explore. My ServicesHere I used the same character settings but with a different color. Use this color for the text #c3b7a4. I colored it differently so that services is more noticeable than the others. Latest From The BlogHere we showcase the 3 most recent article from the blog. I styled it using numbers to make it unique and avoid redundancy of styles. Stay ConnectedTime to open up the social media icons and place them on the canvas. Place it correctly with proper spacing. On this part don’t add a divider :) Step 9: Creating The Footer CopyrightMake a selection in the remaining white space area in the bottom and fill it with any color. Add this Blending Option
Time to add your copyright text, so select Type Tool(T) and type in with correct character settings. Finally we’re done! I really hope that you have learned something from this tutorial that can be used for your future projects. If you have questions just drop it below. Thank you and please don’t forget to subscribe. Final Preview   |


| You are subscribed to email updates from 1stwebdesigner - Graphic and Web Design Blog To stop receiving these emails, you may unsubscribe now. | Email delivery powered by Google |
| Google Inc., 20 West Kinzie, Chicago IL USA 60610 | |
Comments (0)
Post a Comment