

1stwebdesigner |

| Get Inspired: 50 Awesome Portfolios on Behance Network Posted: 10 Aug 2010 02:00 PM PDT
1. Jerico SantanderName: Jerico Santander Location: Las Palmas de Gran Canaria, Spain Creative Fields: Illustration, Art Direction, Digital Art 2. Tony AriawanName: Tony Ariawan Location: Yogyakarta, Indonesia Creative Fields: Digital Art, Illustration, Design 3. Si scottName: si scott studio Location: Manchester, United Kingdom Creative Fields: Illustration, Typography, Design 4. Sakke SoiniName: Sakke Soini Location: Helsinki, Finland Creative Fields: Graphic Design, Illustration, Digital Art 5. Pete HarrisonName: Pete Harrison Location: Paignton, United Kingdom Creative Fields: Typography, Graphic Design 6. Peter JaworowskiName: Peter Jaworowski Location: Warsaw, Poland Creative Fields: Advertising, Art Direction, Digital Art 7. Mike CampauName: Mike Campau Location: Birmingham, MI Creative Fields: Digital Art, Photo Manipulation, Photo Illustration 8. David WatersName: David Waters Location: Moscow, ID Creative Fields: Photo Manipulation, Digital Art, Graphic Design 9. Brian GossettName: Brian Gossett Location: Santa Monica, CA Creative Fields: Art Direction, Graphic Design, Motion Graphics 10. Karol KolodzinskiName: Karol Kolodzinski Location: Warsaw, Poland Creative Fields: Web Design, Art Direction, Illustration 11. Yuta OnodaName: Yuta Onoda Location: Toronto, Ontario, Canada Creative Fields: Digital Art, Fine Arts, Illustration 12. Cristiano SiqueiraName: Cristiano Siqueira Location: Sao Paulo, Brazil Creative Fields: Advertising, Graphic Design, Illustration 13. Christian NauckName: Christian Nauck Location: Berlin, Germany Creative Fields: Illustration, comic, Game Design 14. StudioKxxName: StudioKxx Krzysztof Domaradzki Location: Poznan, Poland Creative Fields: Web Design, Design, Illustration 15. 96k liuzhengName: Liu zheng Location: Beijing, China Creative Fields: Art Direction, Motion Graphics, Graphic Design 16. Alex TrochutName: Alex Trochut Location: Barcelona, Spain Creative Fields: Typography, Illustration, Art Direction 17. Natalie SklobovskayaName: Natalie Sklobovskaya Location: Saint Louis, MO Creative Fields: Web Design, Design, Illustration 18. Craig WardName: Craig Ward Location: London, United Kingdom Creative Fields: Graphic Design, Illustration, Typography 19. Irina VinnikName: Irina Vinnik Location: Saint Petersburg, Russia Creative Fields: Drawing, Design, Illustration 20. Simone MagurnoName: Simone Magurno Location: San Francisco, CA Creative Fields: Web Design, Illustration, Graphic Design 21. Alex AndreyevName: Alex Andreyev Location: Saint Petersburg, Russia Creative Fields: Painting, Digital Art, Cinematography 22. Joanna KustraName: Joanna Kustra Location: London, United Kingdom Creative Fields: Photo Manipulation, Fashion, Photography 23. HappycentroName: Happycentro creative studio Location: Verona, Italy Creative Fields: Illustration, Art Direction, Graphic Design 24. Pawel NolbertName: Pawel Nolbert Location: Warsaw, Poland Creative Fields: Web Design, Art Direction, Design 25. Robinsson CraventsName: Robinsson Cravents Location: Medellin, Colombia Creative Fields: Art Direction, Branding, Graphic Design 26. Fernandes VilmarName: Fernandes Vilmar Location: Stockholm, Sweden Creative Fields: Graphic Design, Interaction Design, Art Direction 27. YOUYOU is a creative’s' collective operating in the communication and advertising areas. Location: Modena, Italy Creative Fields: Graphic Design, Branding, Art Direction 28. Alberto CerritenoName: Alberto Cerriteno Location: Seattle, WA Creative Fields: Design, Digital Art, Animation 29. Job HallName: Job Hall Location: Los Angeles, CA Creative Fields: Editing, Film, Directing 30. Chris CorkName: Chris Cork Location: Melbourne, Australia Creative Fields: Writing, Directing, Ideation 31. James WhiteName: James White Location: Halifax, Nova Scotia, Canada Creative Fields: Art Direction, Graphic Design, Print Design 32. Studio NufabricName: Studio Nufabric Location: Sofia, Bulgaria Creative Fields: Motion Graphics. Typography. Graphic Design 33. Barral FabienName: Barral Fabien Location: Clermont-Ferrand, France Creative Fields: Branding, Art Direction, Graphic Design 34. Andrew DyjakName: Andrew Dyjak Location: Katowice, Poland Creative Fields: Typography, Illustration, Digital Art 35. David FuhrerName: David Fuhrer Location: Bern, Switzerland Creative Fields: Digital Imaging, Digital Art, Design 36. Pino LamannaName: Pino Lamanna Location: Wuppertal, Germany Creative Fields: Illustration, Branding, Character Design 37. Florencia mazzaName: Florencia Mazza Ramsay Location: Buenos Aires, Argentina Creative Fields: Film, Photography, Fashion, Digital Photography, Art Direction 38. Andreas stavrinidesName: Andreas stavrinides Location: London, United Kingdom Creative Fields: Advertising, Photography, Fashion 39. Rinze van BrugName: Rinze van Brug Location: New York, NY Creative Fields: Architecture, Photography, Fashion 40. Nickolas SushkevichName: Nickolas Sushkevich Location: Moscow, Russia Creative Fields: Visual Effects, Graphic Design, Digital Photography 41. Kim HoltermandName: Kim Holtermand Location: Varlose, Denmark Creative Fields: Photography, Digital Photography, Fine Arts 42. Rengim MutevelliogluName: Rengim Mutevellioglu Location: Paris, France Creative Fields: Photojournalism, Fine Arts, Photography 43. Julia PogodinaName: Julia Pogodina Location: New York, NY Creative Fields: Fashion, Photography 44. Victor EredelName: Victor Eredel Location: Petrozavodsk, Russia Creative Fields: Illustration, Digital Photography, Music Composition 45. Ashburn EngName: Ashburn Eng Location: Singapore City, Singapore Creative Fields: Styling, Photography, Fashion 46. Graphistolage DavidName: Graphistolage David Location: Orleans, France Creative Fields: Photo Manipulation, Photography 47. Trevor BradyName: Trevor Brady Location: Vancouver, British Columbia, Canada Creative Fields: Editorial Design, Fashion, Photography 48. Will SleggName: Will Slegg Location: Plymouth, United Kingdom Creative Fields: Graphic Design, Photography, Digital Photography 49. John WildgooseName: John Wildgoose Location: London, United Kingdom Creative Fields: Photography 50. Fernando ForeroName: Fernando Forero Location: Kalisz, Poland Creative Fields: Graphic Design, Design, Art Direction
   |
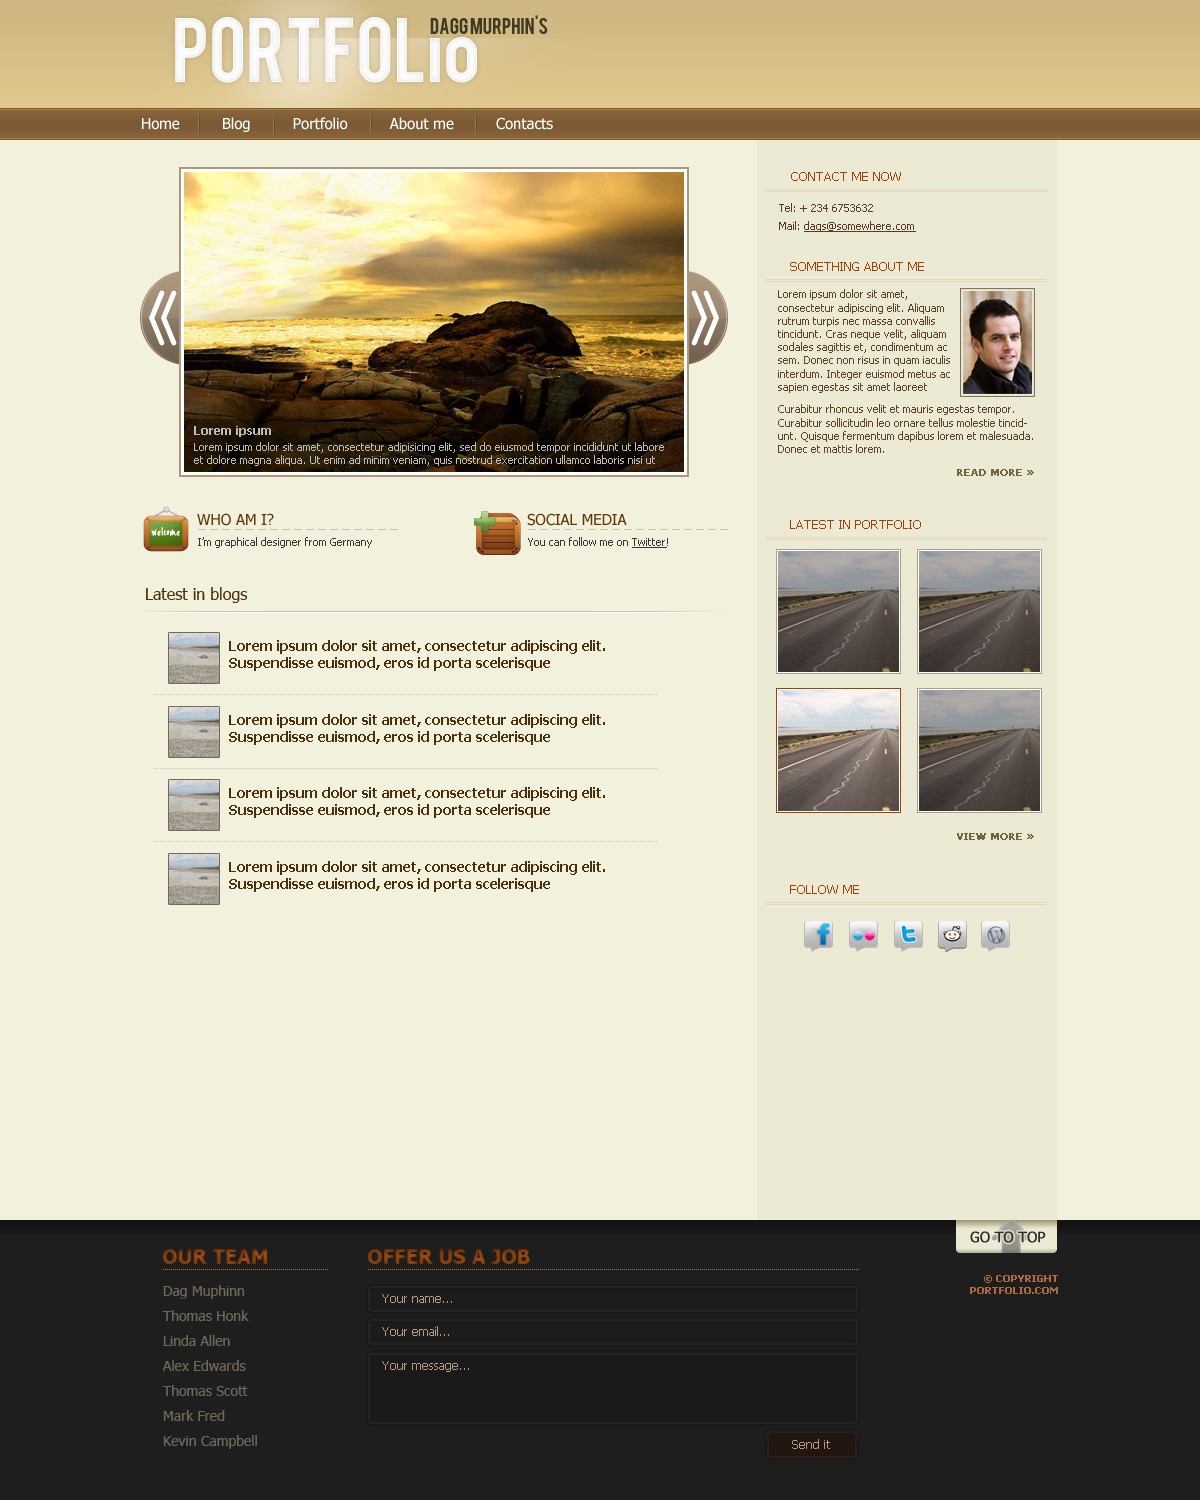
| How to Create a Killer Portfolio in Photoshop [Very Detailed] Posted: 10 Aug 2010 03:00 AM PDT
Resources that you will need: Step 1 – Creating documentSo, lets create new document, (File > New…). Make this document 1200 px per width and 1500 px per height and press OK. Step 2 – Background2.1 Convert “Background” layer to “Layer From Background…”. Thats because to let us make this layer editable. 2.2 Rename “Layer 0″ to “Background”. 2.3 Press right mouse button on layer to go to Blending Options. 2.4 Set Color Overlay to #f2f1dd Step 3 – Headers Background3.1 Take "Rectangular Marquee Tool" and set Style to "Fixed Size", set width to 1200 px and height to 108 px. 3.2 Select now the very top (just like in the previous image), create new layer, name it "header background" and fill it with any color using "Paint Bucket Tool". 3.3 Go to layers "header background" Blending Options > Gradient Overlay. Change only color, everything else is by default. So color use from #dfc78d to #ccb681. Step 4 – Logo4.1 Write logo or use your own logo. I wrote logo and made some nice modifications to it. So write down "PORTFOLIO", set font to Bebas (it’s in the resources section upper), font size to 72 pt and set it to "Smooth", put it somewhere in headers section. Something like that: 4.2 Lets add some nicer look to logo. Go to Blending Options. Set Drop Shadow:
Everything else is by default. Set Inner Glow:
Everything else is by default. Set Stroke:
Everything else is by default. So now it must look much more better than before. 4.3 Adding "Dagg Murphinn’s". Write down persons name, use this setup: font – Bebas, size – 18 pt, "Smooth", color – #403a20. Put it in place like this: 4.4 Lets cut "IO". We need to "Rasterize Type" layer "PORTFOLIO", to do this click with mouse right button on layer "PORTFOLIO" and select "Rasterize Type". This is because to let us delete some area from "IO". Now take "Rectangular Marquee Tool" and select like this ("DAGG’s" height and some pixels more): Oh, and if you cant select that area, then you forgot to change "Rectangular Marquee Tool’s" Style to Normal. So move selected area: Don’t forget that now you have selected layer "PORTFOLIO". Now just click button Delete on keyboard. Select this area: Press and hold CTRL and drag with mouse selected area: 4.5 Lets add some shining things. Create new layer between "header background" and "PORTFOLIO", name it "shiny 1". Select that area (in picture below), take "Brush Tool" and take brush like this – With "Eraser Tool" take the same brush style (just like before upper) and smaller size (I took 300 px) delete these areas: Select this area: Create new layer "shiny 2", place it under "shiny 1" layer. Take "Brush Tool" and again brush is the same style, but size ~ 200 px. Click one time in selected area! Delete these areas just like before, and set layers "shiny 2" opacity to 40%. YEAH! With logo we have done! To let us work more easily and more qualitative, lets create folders to group layers. Click on layer "Dagg murphin’s" and create new folder. Now click on the same layer "Dagg murphin’s", and holding Shift button on your keyboard click on layer "header background". It must look like that: and then simply drag selected layers into that folder. I forgot to change folders name, so name it "header". Lets group a little bit more, make folders like that: Step 5 – Menu5.1 Make new layer into folder "menu", name it "menu background". Take "Rectangular Marquee Tool", select Style to "Fixed Size" – width: 1200 px and height: 32 px. Select area under header, like that: Fill it with color #7b5a34 using "Paint Bucket Tool". 5.2 Create new layer above layer "menu background", name it "menu background 2". Select area with "Rectangular Marquee Tool", Style to "Fixed Size" – width: 1200 px and height: 30 px, like: Fill it with color #a87c47. 5.3 This is very similar to point 5.2. Create new layer above layer "menu background 2", name it "menu background 3". Select area with "Rectangular Marquee Tool", Style to "Fixed Size" – width: 1200 px and height: 28 px, like: Fill it with any color. Now go to layers "menu background 3" Blending Options > Gradient Overlay. Change only color:
5.4 Write menu links. Setup:
5.5 Creating separators. Create new layer above layer "Home …",name it "sep". Take "Rectangular Marquee Tool", Style - Normal. Fill selected area with white color. Add Layer mask to that layer: Take "Gradient Tool" and use setup "black to white to black" like this: Take Gradient action across layer, from one side to other. Must be like this: Duplicate layer "sep". Move new layer 1 px to right. Go to Blending Options > Color Overlay and chose black color. Set opacity to both "sep" layers to 20%. Merge both layers (select both layers > press mouse right button > Merge layers). Name new layer to "separator". Duplicate this layer as much times as you have links and count off 1. So I have 5 links, so I must have 4 separators. The first one is already created, so i must duplicate this layer 3 times. When that is done, place layers between every two links. Step 6 – Slider6.1 Create new folder – "Slider". Create new layer into "Slider"’s folder, name it "picture". Get some picture and resize it to 434 px per width and 322 px per height. That’s random digits, you can chose your own size. 6.2 Duplicate this layer and put it under "picture" layer. Go Blending Options and use steup:
Now we need to increase every side on edge to 5 px. To do this, press CTRL + T, zoom in to facilitate work and drag every side outside 5 px. 6.3 Creating arrows. Create new folder under layer "picture copy", name it "arrow left". Take "Ellipse Tool" and make a ball holding Shift on keyboard. Put it in place like this: Do Gradient Overlay on that layer. Colors: from #70604e to #af977c. 6.4 Rasterize layer "Shape 1" (4.4) and rename it to "arrow background". Now you can do two ways to select that area that you do not need: just selecting area to delete, or holding CTRL (in that place in image below) and selecting all layers area: Now just click Delete on keyboard. Create new layer above layer "arrow background", name it "stroke", select all "arrow background" area (just like in step 6.4), go to Edit > Stroke… Use color #c2b8ab for stroke and location inside. Zoom in, press CTRL + T to resize, and reduce all sides by 1 px except the right one. add layer mask (5.5), take Gradient Tool and use gradient from black to white, now just drag it from right to left. Create new layer above previous one. Name it "shiny". Select all layer "arrow background" and unselect from it bottom. Fill it with white color and go to its blending options. Setup:
Create new layer above previous one, name it "arrow", take "Rounded Rectangle Tool" and set radius to 10 px or more. Make it like this: Press CTRL + T and rotate it like this: Do "Rasterize Layer" (4.4) and delete area that is under "shiny" layer. Duplicate this layer (5.5), press CTRL + T and transform it vertically (right click and Flip Vertical), drag it under previous layer. Merge both arrow layers (5.5), duplicate the new one and place both layers that you like it. And merge these arrow layers again, rename it to "arrows". To copy all this what we have done to arrows, lets copy (duplicate) folder "arrow left" and rename it to "arrow right". Holding SHIFT drag it to right side of picture. Press CTRL + T and transform it horizontally (right click > Flip Horizontal). Arrows completed! 6.5 Adding some extra text one picture. Create new layer above layer "picture", name it "text background". Select all "picture" area (6.4), unselect some area: Fill in that area with black color and set opacity to this layer 35%. Write down some random text. Setup to heading:
Setup to paragraph:
Step 7 – Creating "Fast info"7.1 Create new folder below "Slider" folder. Name it "Fast info", create again new folder in this filder, name it "who am i". Upload some icon. Name this layer "icon". Write some text. Setup:
7.2 Create new layer, doesn’t matter how you name it. Select area like this (only 1 px per height): Fill it with #d5bba2. Now duplicate this layer and drag it like this: Merge layers. And repeat duplicating layers and merging til you get something like this: Rename this layer as "line". Write down dome random text. Setup:
Now you have one "fast info" completed, now you can re-do steps 7.1 and 7.2 to create second one or copy these layers (all folder) to create second "fast info". Step 8 – Latest in blogs8.1 Create new folder below "Fast info" folder, name it "Latest in blogs". Write "Latest in blogs". Use this setup:
Create new layer under previous one. Select area (1 px height): Fill it with black color. Set opacity to this layer 20%. Duplicate this layer and drag it 1 px under previous layer. Go to Blending options and set Color overlay to white. Set Opacity to this layer 100%. Merge both these layers and rename new layer to "line". Now you must erase right and left side for better looking. To do this, take "Eraser Tool", brush style like this – 8.2 Grab some random picture, resize it to 50 x 50 px. Rename it to "pic", go to its blending options > stroke and user setup:
Write some random text. Setup:
Now you must create line like this: To do that, you just need to follow step 7.2, but lines pixels are 1 x 1. When it’s done, rename new layer to "line", and set color overlay to #cac4b0 color. Make folders and layers like this: Now duplicate folder "article" as many times as you wish and drag it below, I did 4. And remember to delete layer "line" in last "article" folder, because that layer is needless. So, left side is now completed! Step 9 – Right side9.1 Create new folder below folder "Latest in blogs", name it "right side". Grab "Rectangular Marquee Tool", set style to Fixed size – width 300 px, height 1300 px. Select area like this: Create new layer "background". Fill it with #ece9d4 color. 9.2 Create new folder inside this folder, name it "contact me now". Write some text, use this setup:
9.3 Select area with "Rectangular Marquee Tool", using 1 px per height. Create new layer, fill it with #dfd8c1 color. Now duplicate this layer and drag it 2 pixels down. Merge these two "line" layers, rename it to "hr". 9.4 Add some text with this setup:
9.5 Re-do steps 9.2 to 9.4 (or just duplicate these layers and rename such things as "contact me now") as many times you wish to add some panel. Now you will have some challenge to do by yourself, now when you have learned how to make some very simple things in Photoshop, you must add panels. I think that you can do these simple things. I will just say some stups that will help you. For picture: How to make border like that: take a look at step 6.2, but here borders color is #7d765e For "more":
For picture that is not hovered: How to make border like that: take a look at step 6.2, but here borders color is #a7a089 And also, go to blending options > color overlay > color: #000000, opacity: 30%. For picture that is hovered: How to make border like that: take a look at step 6.2, but here borders color is #9e4306 And there is no such thing as color overlay for hovered layer. Icons you can get from icon pack at the top of article. If you have successfully followed previous steps, than you must have something like this: Step 10 – Footer10.1 Create new folder below folder "right side", name it "footer". Create new layer "background", take "Rectangular Marquee Tool" and set Style to "Fixed Size", set width to 1200 px and height to 280 px. Now select very bottom of document. Fill it with #1e1e1e color. Go back to "right side" layer "background" and delete area that is needless. 10.2 Go back to "footer". Create new layer above "background", name it "shadow", select area: Fill it with any color. Go to blending options > gradient overlay and change only colors: from #1e1e1e to #121212. 10.3 Above layer "shadow" create new folder named "our team", in it write text "OUR TEAM" using this setup for Inner Shadow: And for color overlay use just color #c55b13. 10.4 Create line like this (just the same as in step 8.2, but color overlay chose #ba7546): 10.5 Write down some names and surnames: Setup:
10.6 Duplicate folder "our team" and delete last layer (where are names and surnames), rename new folder to "offer us a job", then extend line: 10.7 Take "Rounded Rectangle Tool", set radius to 4 px. Drag it like that: Use setup: Drop Shadow: Inner Glow: Gradient Overlay (From #1a1a1a to #1c1c1c to #1a1a1a): And get something like this: Write some text, setup:
10.8 Duplicate these layers: 10.9 Create button, use the same steps as in 10.7: Setup: Drop Shadow: Inner Glow: And color overlay just color #21160f. 10.10 Create new folder below "offer us a job", name it "button and copyright". Create shape with "Rounded Rectangle Tool", radius 4 px. Do "Rasterize Layer" (4.4) and delete needless area to get something like this: Use Gradient Overlay setup for this layer: From #b1ae95 (0%) to #ece9d4 (17%) to #ece9d4 (74%) to #a19c7c (100%) Name this layer as "top background". 10.11 Add arrow from icon pack at the top of article. Delete needless area and go Images > Adjustments > Desaturate. 10.12 Add text using setup:
Drop Shadow: And color overlay just color #2c2c2c. 10.13 And copyright using setup:
And that’s it! We’re done! Please post your outcomes!  |


 , use size for brush approximately 560 px and just click it like that:


| You are subscribed to email updates from 1stwebdesigner - Graphic and Web Design Blog To stop receiving these emails, you may unsubscribe now. | Email delivery powered by Google |
| Google Inc., 20 West Kinzie, Chicago IL USA 60610 | |
Comments (0)
Post a Comment