

1stwebdesigner |

| Making Money Online:How To Earn Money From Twitter Posted: 25 Aug 2010 02:00 PM PDT
These are some good ways to earn money using Twitter, but I suggest you don't over do it as you would look like a spammer & no one likes to get spam not even on their Twitter Timeline. So use this method cautiously Affiliate AdvertisementIf you are connected with many affiliates to sell their product and services, you can use Twitter account to tweet your affiliate links to your followers & get paid for the selling product. Be cautious using this method, see that you are not breaking the terms of service agreement. Increasing TrafficImage: Source This is indirect method of monetizing Twitter. Many people use this method effectively to send huge amount of traffic to their website which in turn generates revenue from the ads you post on your website. Look For LeadsImage: Source When I was working as an marketing executive I had used Twitter to find potential leads for the company. Twitter Advance Search offers some best method to find people who are looking for services & products. This is an indirect method but still you can try it. Get Paid To TweetThis is one of the easiest way of making money on Twitter. You Don't need to have a website, product or services to earn money, It's one of the direct way of earning money through Twitter. There are various sites that offers services where you can get paid-per-tweet. Following list of website that offers such services. Its one of the most used website that offers pay-per-tweets services. I have personally used this website to monetize my twitter account & found it to be working & useful. Even many of the celebrities are using Sponsored Tweets Services. Ad.ly is another website which offers similar services. Recently it has also included MySpace to its network. Ad.ly algorithm automatically calculates the amount that you will be paid per tweet. It depends on the factor like number of followers & how often you tweet. Some Other Websites Sell Twitter Related ServicesIf you are designer you can offer services like creating custom professional twitter background you can use your own background to promote it as a service. Also if you know how to get mass follower & influence people on twitter account you can provide services like Twitter profile management & become face of a brand in your local area. Sell Your Product & Services
Selling your product & services through twitter is an also effective way of making money on twitter. You can use Twitter Advance Search option to find out people that are looking for product or services that you are offering & you can directly get in contact with them offering your services. Some Related Post You Must Read
If you have other method to share please do it in comment I would like to know. Thumbnail: Source    |
| How to Build a Custom WP e-Commerce Theme (Part 1) Posted: 25 Aug 2010 03:00 AM PDT
You can preview the theme here or download djavu-shop work in progress theme here. Tutorial Requirements This tutorial assumes you are fairly comfortable using the following languages
What will we learn in this tutorial?
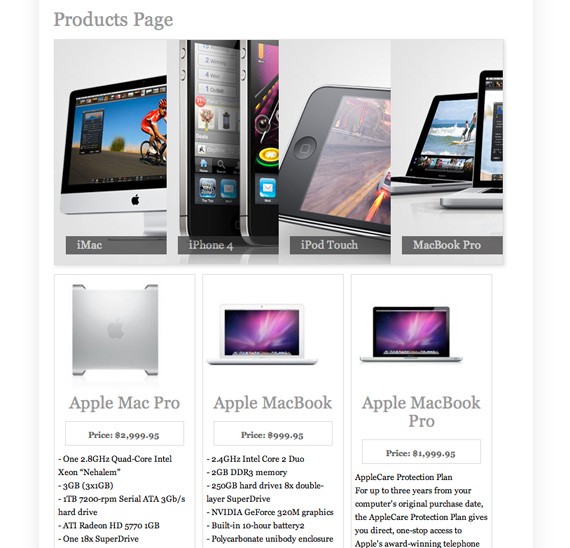
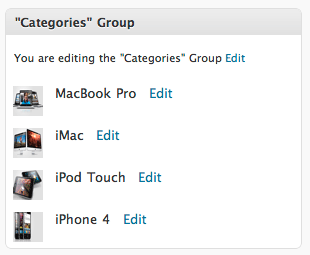
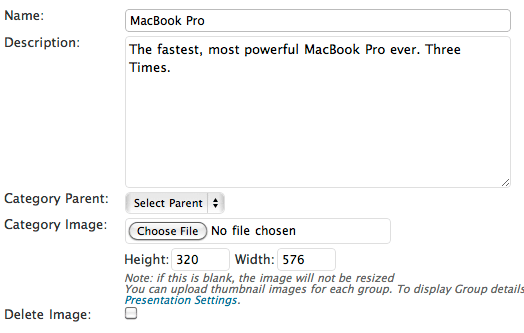
Preview of our WP e-Commerce ThemeThe theme I’m working on is named Djavu-shop. The main feature of this theme is it’s accordion slide on top of the products. This accordion displays the available categories and/or brands. Sliding over the accordion will bring a brief description of the category. A click on the link will display all the products of this category or brand. A few fancy effects such as the buttons and shadows are made with CSS3.This tutorial is the first part of a suite of tutorials. For the first part we will only focus on the product page (see picture above). Anatomy of a WP e-Commerce themeBefore getting stuck into the build process, it’s important to know how WP e-Commerce themes work. Open the default theme (wordpress-directory)/wp-content/plugins/ wp-e-commerce/themes/default), you’ll notice that it’s all contained in a folder, and there’s around 9 core files. Note the default theme is always loaded! Your theme only overrides the default theme behavior. In our theme we will include more files which allow extra customization. Here’s an overview of the main files you’ll be working with: Create a new theme out of the defaultThe best way to start creating your own theme is to make a copy of the original theme. The default theme is in (wordpress-directory)/wp-content/plugins/ wp-e-commerce/themes/default. Duplicate the "default" folder and call it "djavu-shop". After this open the new created theme folder and rename the default.css file to djavu-shop.css. Delete everything inside your css file (!) and put the following code inside of it. <code>/*Theme Name: Djavu-Shop Theme Theme URI: http://www.djavupixel.com Description: Just another WP-e-commerce theme Version: 0.2 Author: Leonel Hilario Author URI: http://www.djavupixel.com*/</code> Login to your wp-admin section and browse to Store>Settings>Presentation page, click on the drop-down list and djavu-shop theme should be in the list. Select it and save changes. Reminder Inside the "djavu-shop" folder you should have the following files: Preparing WP e-Commerce for our themeAdd 4 categories in WP e-Commerce
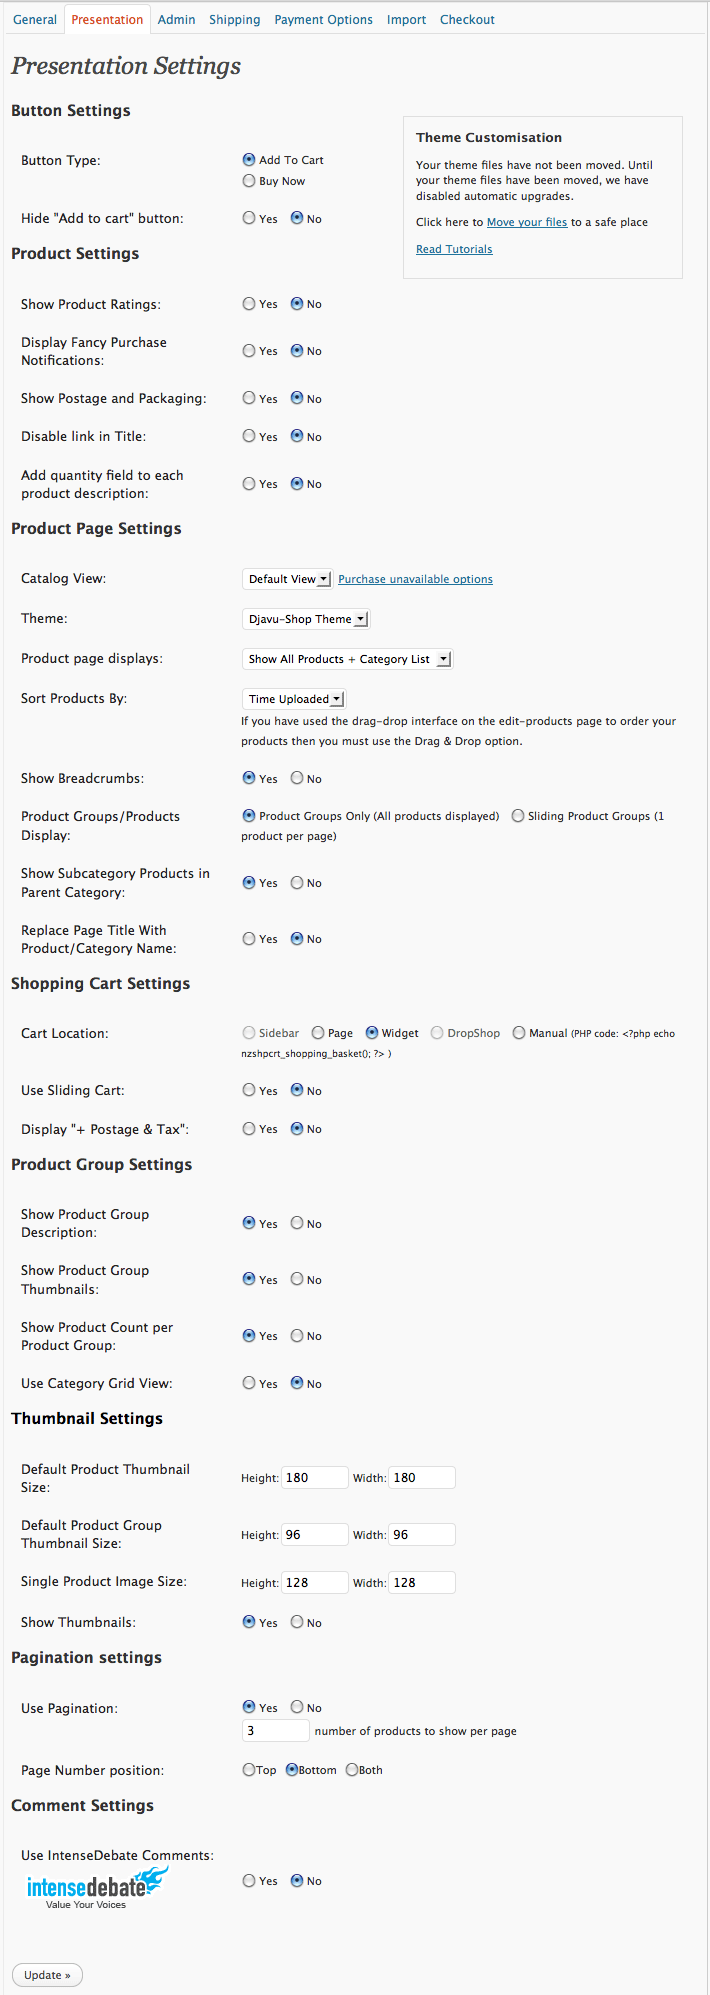
Configure presentation settings Just copy the same settings as in the picture below. Please note that this picture is tall. Click on the image to open the full size Let’s start building our theme!Open products_page.php and go to line 35 it you be “<ul class=’wpsc_categories’>“. Delete line 35 to 48, just before the endif. Here we will add Kwicks for jQuery which is an accordion slider. Here is the PHP/HTML code: <code><ul class='kwicks'> <?php wpsc_start_category_query(array('category_group'=>get_option('wpsc_default_category'), 'show_thumbnails'=> get_option('show_category_thumbnails'))); ?> <li> <div class="kwicks_inner"> <div class="image"><?php wpsc_print_category_image(); ?></div> <div class="caption-title transparent_class"> <?php wpsc_print_category_name();?> </div> <div class="caption transparent_class"> <a href="<?php wpsc_print_category_url();?>" class="wpsc_category_link"><?php wpsc_print_category_name();?></a> <?php if(get_option('wpsc_category_description')) :?> <?php wpsc_print_category_description("<div class='wpsc_subcategory'>", "</div>"); ?> <?php endif;?> </div> </div> </li> <?php wpsc_end_category_query(); ?> </ul></code> We created an unordered list and inside of it we put we kwicks_inner class. Inside we put the picture as we think it is more flexible than putting it on the CSS. In class caption-title we put the title of the category. On mouse over the class caption will be displayed which contains the title and the small description that we entered before (see Preparing WP e-Commerce for our theme). Now open djavu-shop.css and paste this CSS code:
<code>/* Product Page - The accordion (kwicks) effect on top of page */</code> <code> </code> <code>.kwicks { list-style: none; position: relative; margin: 0; padding: 0; border: 1px solid #ddd; box-shadow: 2px 2px 5px #ddd; -moz-box-shadow: 2px 2px 5px #ddd; -webkit-box-shadow: 2px 2px 5px #ddd; }</code> <code> </code> <code>#content #products_page_container ul{ margin: 0; padding: 0; } .kwicks li{ display: block; overflow: hidden; padding: 0; cursor: pointer; } .kwicks li{ float: left; width: 160px; height: 320px; margin-right: 5px; } .kwicks li a { color: #fff; } .kwicks .kwicks_inner { width: 320px; } .kwicks .image { width: 90px; height: 240px; float: left; } .kwicks .caption-title { background-color:#333333; color:#CCCCCC; float:left; font-size:16px; margin:40px 0 0 16px; padding:3px 0 3px 16px; text-align:left; width:100%; } .kwicks .caption { display: none; text-align: center; width: 320px; height: 80px; color: #ccc; font-size: 16px; float: right; /* Playing with CSS - Adding some transparency */ background-color: #333; } .kwicks li.active .caption { display: block; } .kwicks li.active .caption-title { display: none; } </code> <code>.transparent_class { filter:alpha(opacity=70); -moz-opacity:0.7; -khtml-opacity: 0.7; opacity: 0.7; }</code> So this was a bit of code. As you may read we added a few CSS shadows. The .kicks li.active class is fired when a mouse passes over the accordion. Here we hide the .caption-title to show the .caption which contains the title and description of this category. For more information about Kwicks please read the well documented page or if you want to try other nice effects. Now we hase the HTML and CSS code and here is the JavaScript code that will create all the magic: <code><script src="<?php echo $djavu_theme_url ?>/js/jquery.kwicks-1.5.1.pack.js" type="text/javascript"></script> <script type="text/javascript"> jQuery(document).ready(function($){ $('.kwicks').kwicks({ max : 320, spacing : 0 }); }); </script></code> Note that you can put this at the top oder bottom of the page. I would recommend at the bottom of the page so that the layout loads faster. Conclusion
Preview the theme | Download files Further DiscussionHave some thoughts of this theme? Give them to me, I'd love to hear them. This is as much a proof of concept as it is a tutorial. It introduces basic html, css, jQuery, PHP and the WP e-Commerce plugin. I'm sure there will be people out there who will feel that a perfect e-commerce start page is something else. If so, what would you do?  |


| You are subscribed to email updates from 1stwebdesigner - Graphic and Web Design Blog To stop receiving these emails, you may unsubscribe now. | Email delivery powered by Google |
| Google Inc., 20 West Kinzie, Chicago IL USA 60610 | |
Comments (0)
Post a Comment